WHR
Beddgelert Forest Campsite to Bryn-y-felin page
V4.46 updated 1/7/07
Images updated from 28/6/07
Click here for new images on this page
The sections from Beddgelert Forest Campsite Halt to Beddgelert Station approaches and the Beddgelert Station Area itself have been moved to two new pages.
Click here for Beddgelert Forest Campsite to Beddgelert Station
Click here for Beddgelert Station Area
Click here for Laurence Armstrong's latest WHR North map
Click here for Steve Harris' Phase 4 gradient profiles
Click here for Steve Harris' Phase 4 TWA maps
Click here for Chainages and OS Map References
Locations
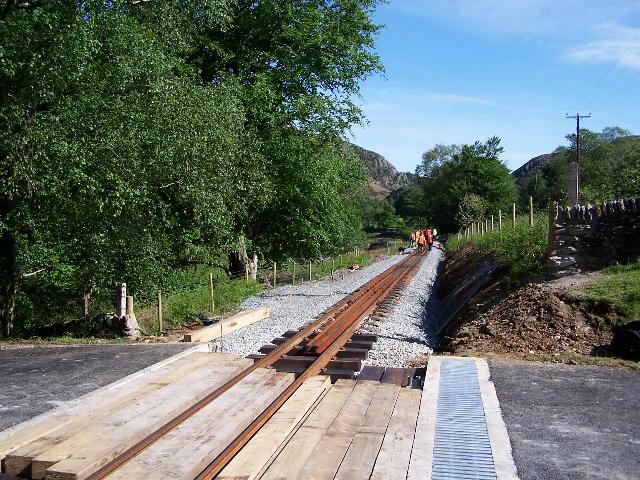
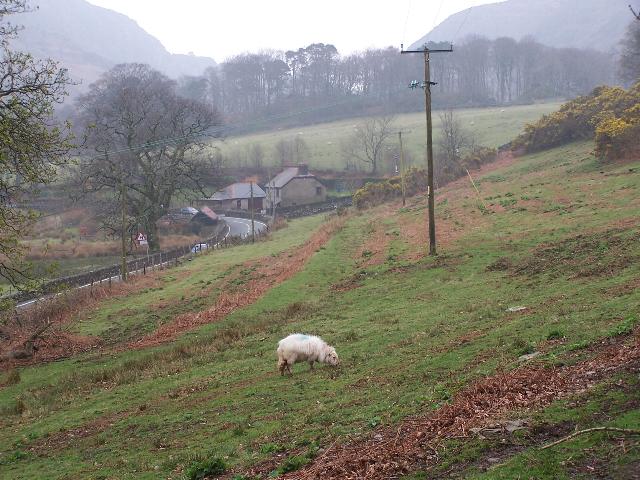
The section begins at LC77 just before the Beddgelert Forest Halt (Ch. 20,000), accessible by permitted paths through Forest Enterprise's large Beddgelert Forest campsite.
Forest Enterprise (ex Forestry Commission) has produced a map (50p). It covers a number of way-marked paths, some of which appeared to be on the WHR trackbed. These were permitted paths.
Click here for map of Walks in Beddgelert Forest.
The railway runs south-east along sidelong ground above the Beddgelert Forest Campsite before entering woodland again. There is a short rock cutting at Ch. 20,500 which terminates at Ty'n-y-coed cottage. A public footpath from the main road crosses the line here and runs over Bwlch Meillionen to the Pennant valley and Gorseddau Tramway.
The trackbed now crosses the Afon Glochig on a small bridge before entering open pasture. To the left are the steeper works of the PBSSR dropping away in cutting on the east side. These 1906 works were to be worked by electric locos creating a 'little Switzerland' in Snowdonia.
Click here for details of the PBSSR route.
The PBSSR route was used as a timber tramway around the time of WW1 and the route of the tramway crossed the WHR alignment just south of the stream bridge and headed to the right, steeply up into the woods to the west of Ty'n-y-coed.
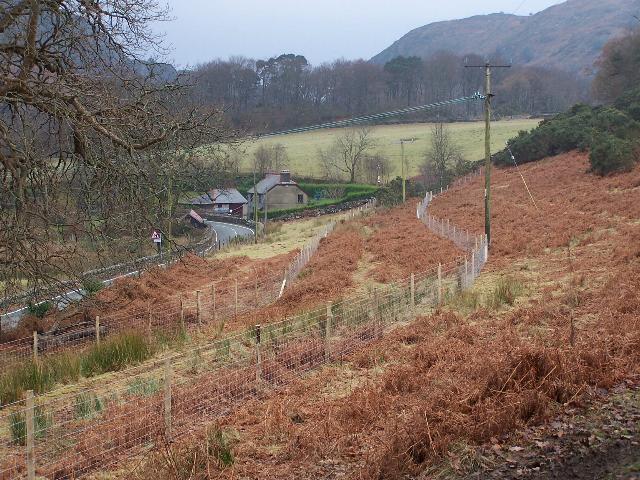
A little further on, the WHR route meets the PBSSR again at Ch. 21,000, now much below and to the east in a deep rock cutting. The WHR trackbed now curves into Nant Cwmcloch, re-entering mature forested land. The alignment crosses a public bridleway from Pont Alun (Beddgelert) and then crosses the Afon Cwmcloch at UB158. The bridge deck is missing.
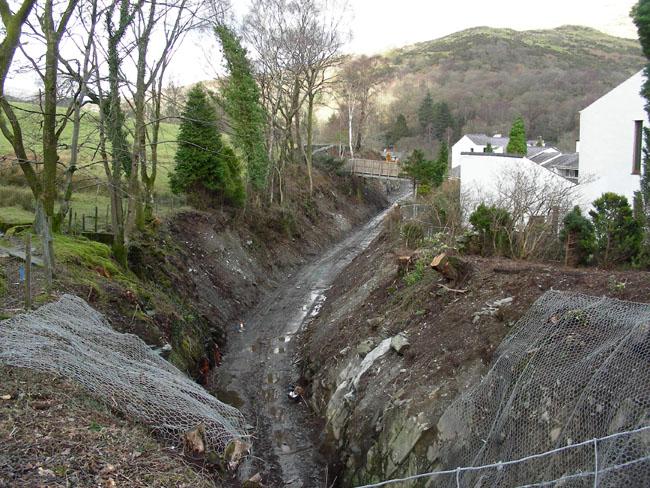
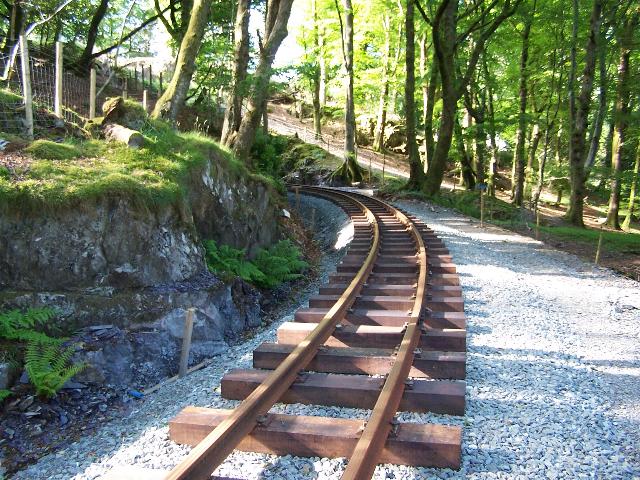
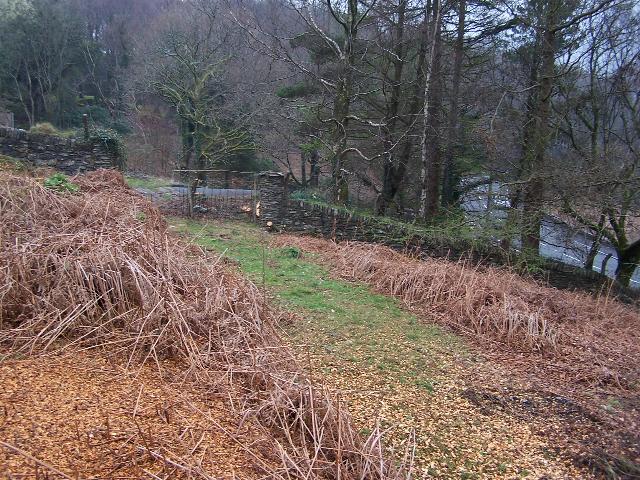
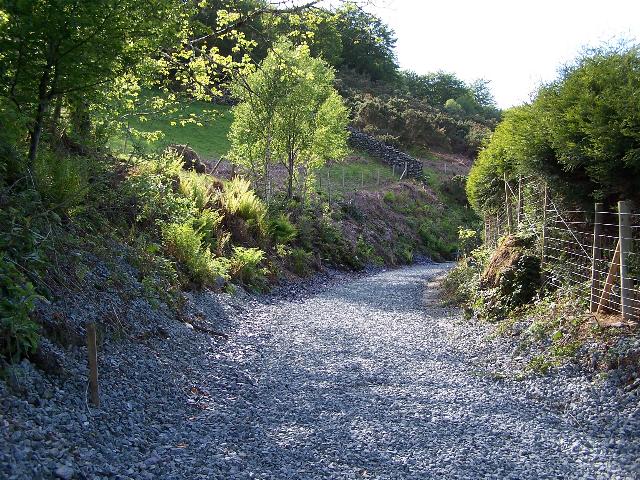
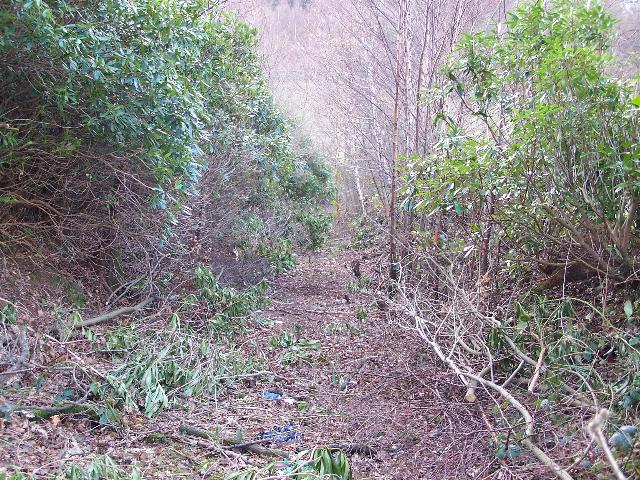
The trackbed now forms a slight embankment across open pasture before curving sharply into the second tight S curve at Ch. 21,300. The return leg can be seen below and to the east, crossing open pasture. A fine rock cutting follows with sheer rock walls that could be a tight squeeze for a Garratt! The cutting has become obstructed with deep sodden leaf mulch that might overtop a pair of wellies! The cutting is several metres deep in the middle and provided fill for the following embankment. By means of a tight 60 m radius curve through the cutting and embankment, the railway reverses its course from south to north.
The railway emerges onto a high embankment at Ch. 21,500. A public footpath from the Goat Hotel runs along the foot of the embankment. The railway runs across open pasture with the previous section visible high on the hillside above to the west. The alignment now crosses the Afon Cwmcloch again at UB164. Although this bridge is present, it will be rebuilt to Garratt loadings.
The railway now recrosses the bridleway from Pont Alun (Beddgelert north end). The alignment passes Cwm Cloch Isaf farm in a shallow cutting which appears to have been fenced off and used for agricultural purposes by a local farmer.
At LC87, the alignment meets the PBSSR again on an embankment to the west, descending from Ty'n-y-coed by its shorter steeper route to Beddgelert station. The two formations merge at Ch. 22,000 as the WHR sweeps around the second half of the S curve to arrive in Beddgelert from the north west.
The railway passes over UB165, a bridge over the Pont Alun bridleway that is missing and needs rebuilding. The railway now crosses the Afon Cwmcloch for the third and final time on an arched bridge before entering Beddgelert station limits.
Beddgelert station had a passing loop and three sidings, evidence for which is still visible. The railway passes over the missing UB167 at the north end of the station. This crosses the public bridleway from UB165 to the Goat Hotel. It needs rebuilding and widening as the new loop will begin immediately to the north of this bridge.
A public bridleway from the Goat Hotel wanders through the station site from a gate in the new housing estate. There are a number of ill-defined permitted paths in this area too.
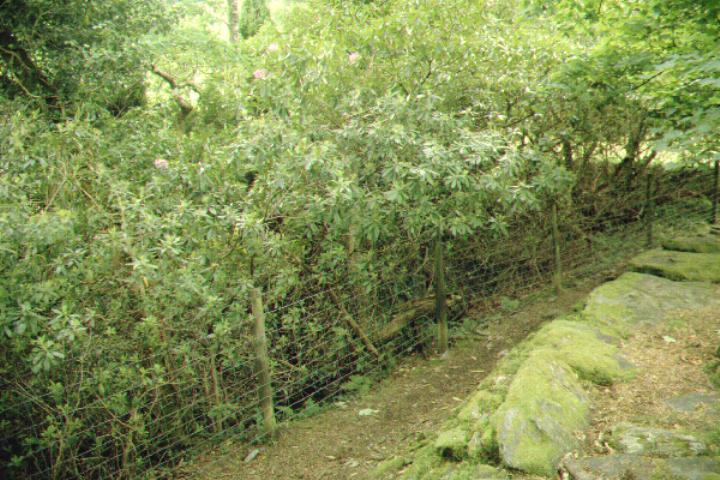
Although a stile leads into the Goat Hotel cutting, the cutting is severely overgrown and wet and the status of the path and its destination is not known as it can only lead to the Goat Tunnel.
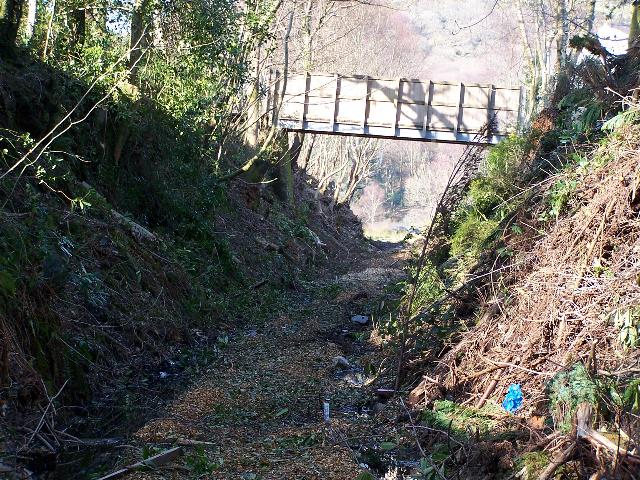
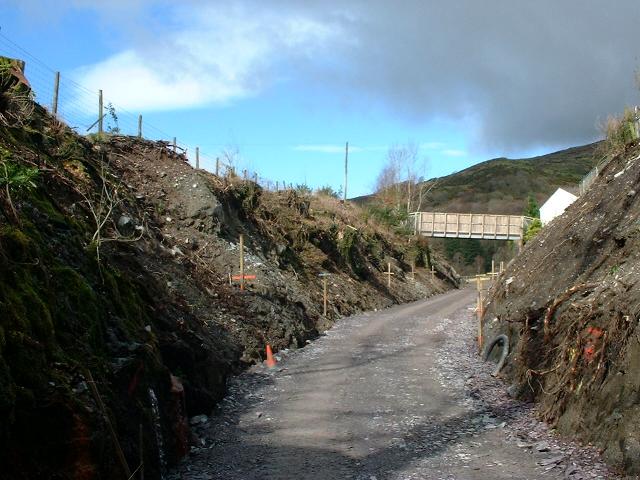
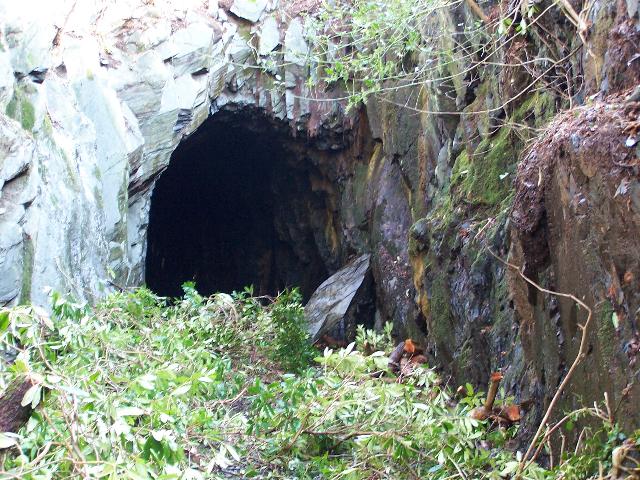
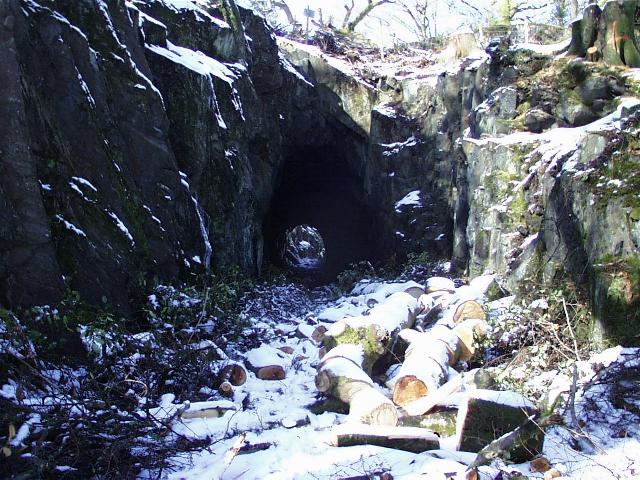
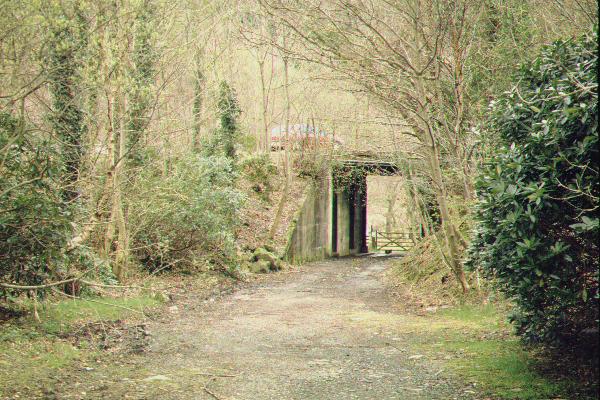
A public footpath from the Goat Hotel crosses the line part way along the cutting at Ch. 22,500 by means of a concrete overbridge. A collapsed aqueduct is seen blocking the entrance to the short Goat Tunnel (No. 1 Tunnel), some 38m long. A permitted path runs alongside the former hotel reservoir and through Oberon Wood to the south end of the Goat Tunnel.
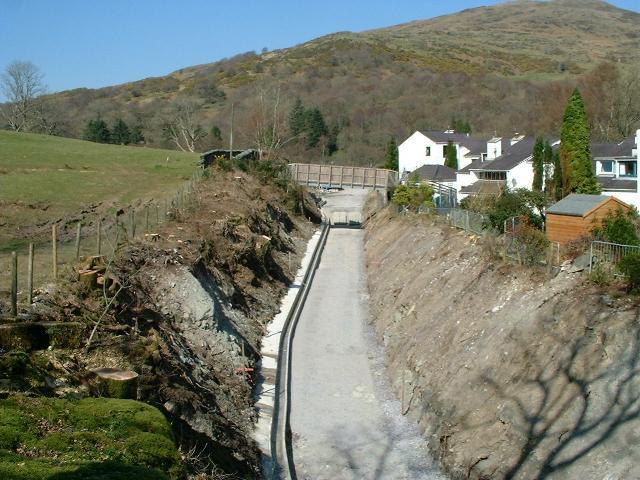
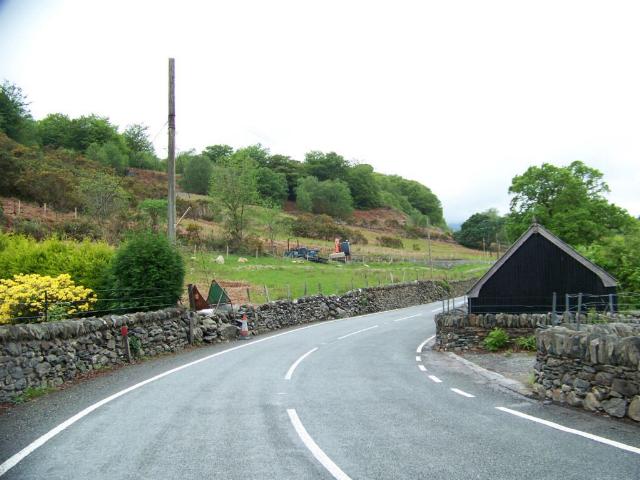
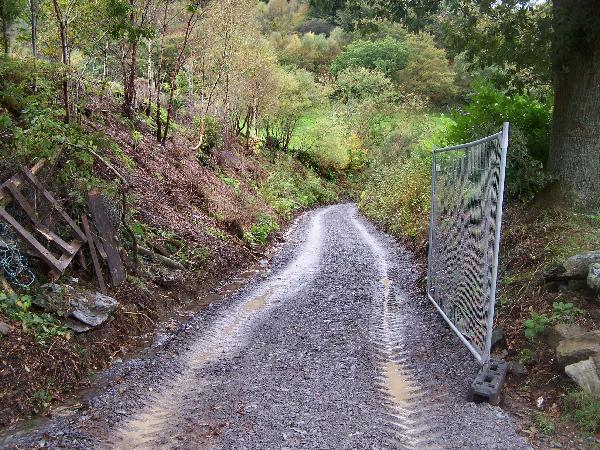
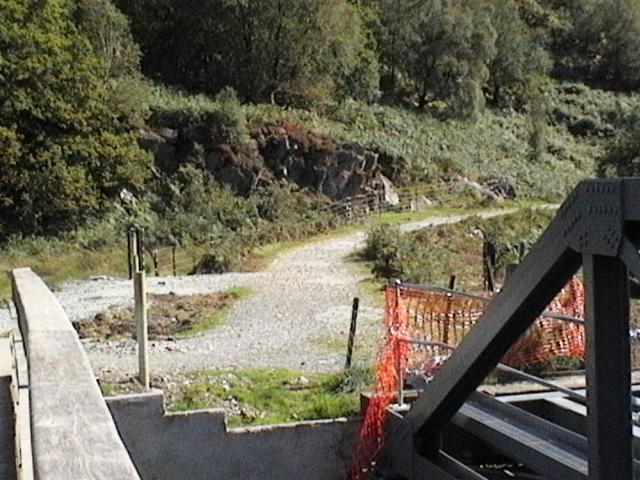
At the south end of the Goat Tunnel, the WHR makes a sharp right turn onto a valleyside ledge, running south towards Bryn-y-felin. The course of the abandoned steeper PBSSR can be seen going over a road bridge above the A498 directly ahead at this point. The railway now crosses the entrance to the Beddgelert Cemetery at Ch. 22,800. This is also a bridleway crossing.
The route now falls alongside the A498, passing behind Bryn-y-felin cottage and curving to the east to meet the main road. A car park and permitted path on the trackbed have become established here. The railway now curves under OB173, the A498 and runs onto a short embankment to the recently removed Afon Glaslyn bridge UB174. A public footpath bridge over the Afon Glaslyn was constructed immediately to the north of the railway alignment and opened in 2003 to restore a number of circular walks in this area based on Beddgelert or Nantmor.
Gradients
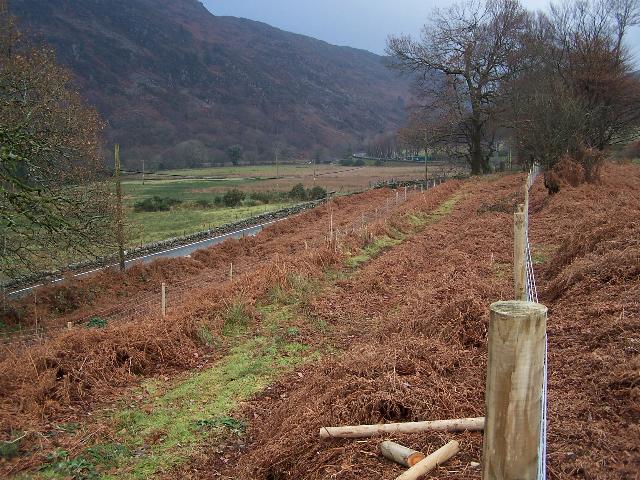
The railway drops at 1 in 40 from Beddgelert Forest Halt, compensated to 1 in 44 and 1 in 48 through the first half of the S curve. The relentless 1 in 40 resumes on the straight leading back towards the PBSSR alignment. This is eased to 1 in 43 through the final curve into Beddgelert station and in the station itself.
The 1 in 40 resumes in Goat Cutting and through No. 1 Tunnel. This is eased to 1 in 48 for the sharp curve onto the valleyside shelf before resuming at 1 in 40/100/55 approaching Bryn-y-felin. Finally the railway drops steeply at 1 in 46 under the road bridge to run level across the Afon Glaslyn bridge.
Goat Tunnel
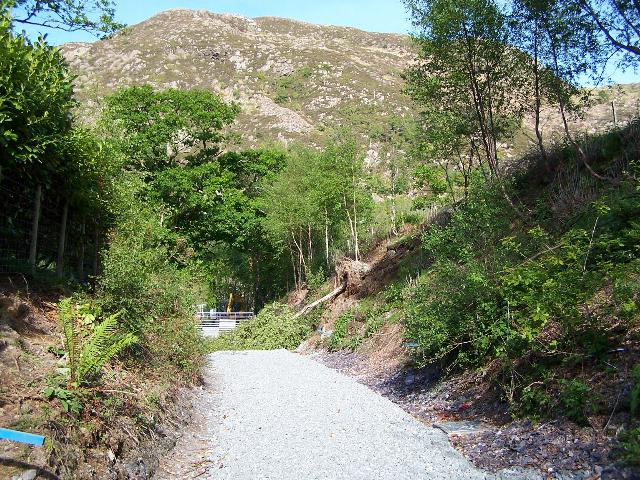
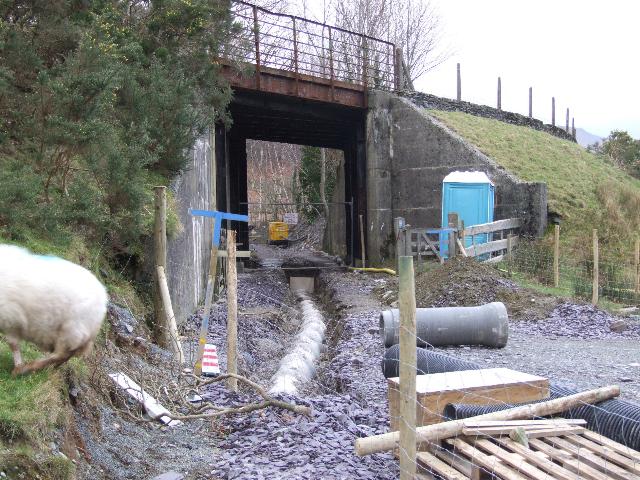
At the south end of the station the railway runs into the Goat Cutting and a short (38m long) tunnel under Oberon Wood. At the south end of the tunnel the alignment curves south onto a shelf on the side of the Afon Glaslyn valley. The adjacent road bridge is the remains of the incomplete steeper PBSSR formation.
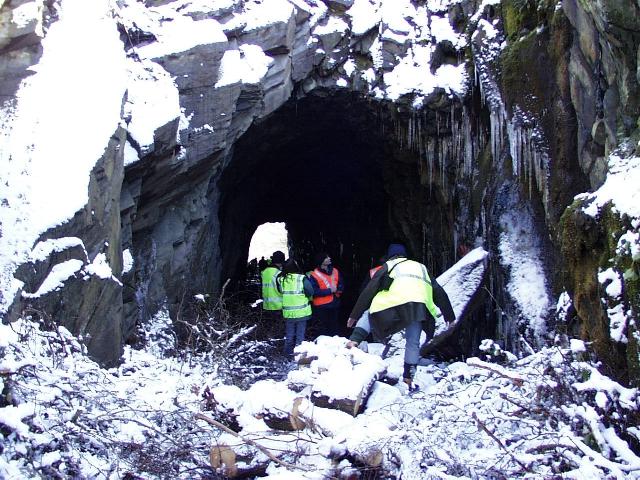
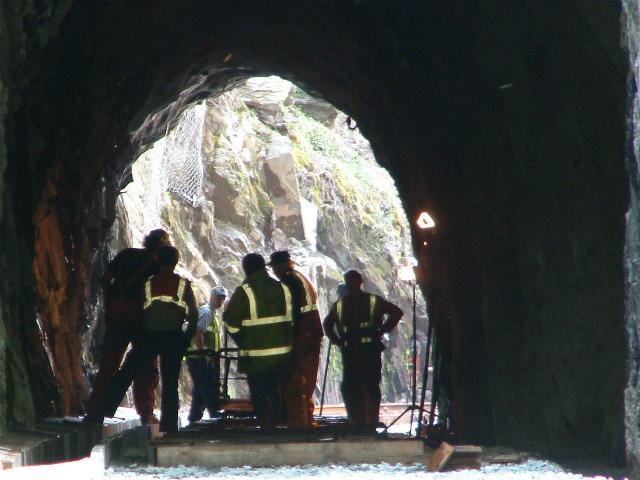
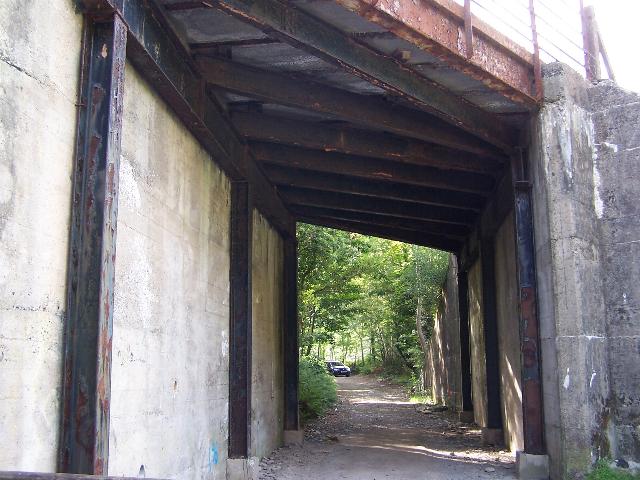
This southerly view (29/5/01) shows the south end of the Goat Cutting at the point where the railway enters the 43m Goat Tunnel. The stone bank on the right is the former dam of the Goat Hotel reservoir. The access cutting is a deep vertical sided rock cutting. A fallen aqueduct from the Goat Hotel reservoir blocks the cutting. The Goat Hotel is to the left. Click on the image to enlarge. This image is copyright B.W.Hughes. Slide scan technology utilised is Olympus ES10 & iPhoto Plus4. Slide scanned at 200dpi.
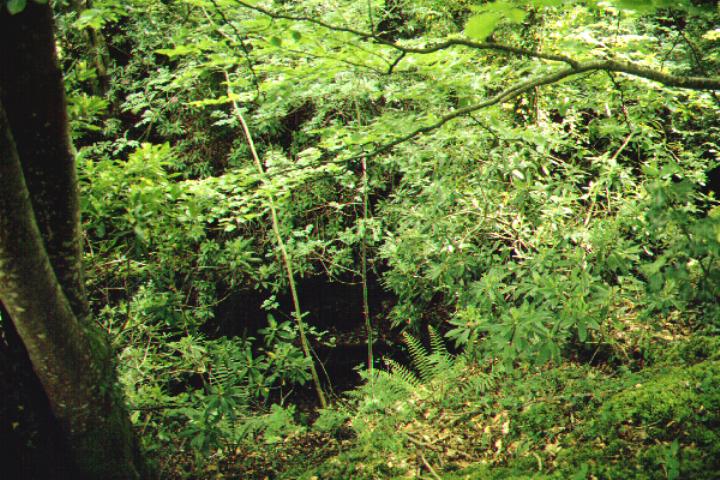
This southerly view (29/5/01) taken over the fence from the footpath shows the deep rock cutting at the north end of the Goat Tunnel where the fallen aqueduct blocks the cutting. Click on the image to enlarge. This image is copyright B.W.Hughes. Slide scan technology utilised is Olympus ES10 & iPhoto Plus4. Slide scanned at 200dpi.
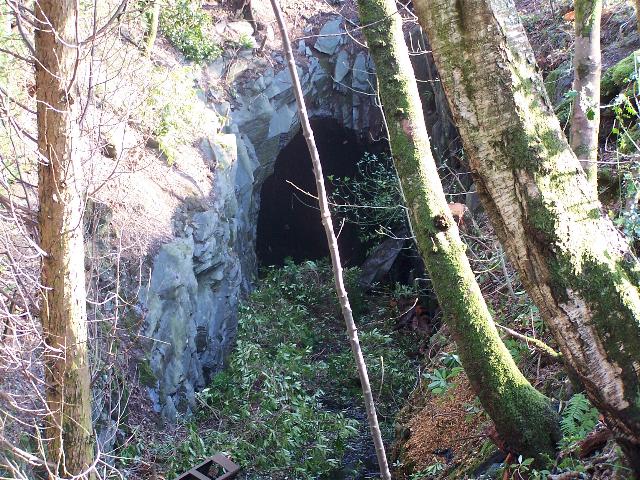
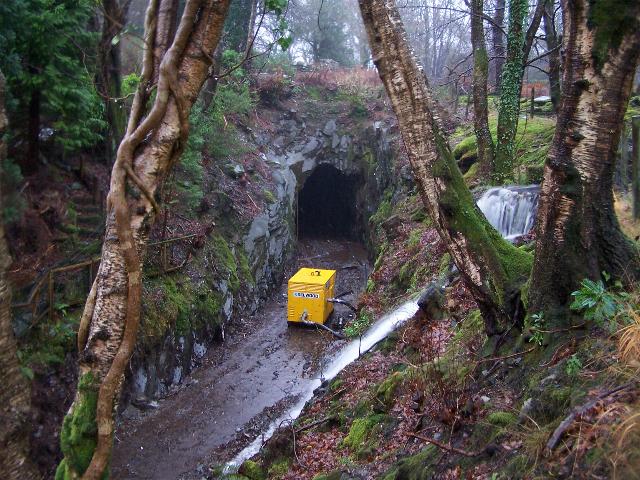

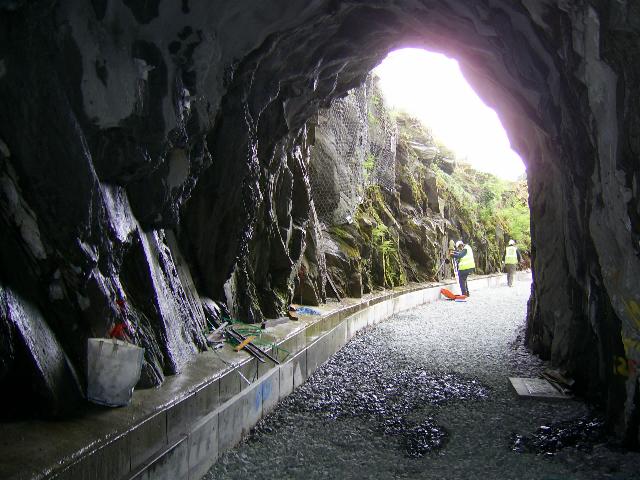
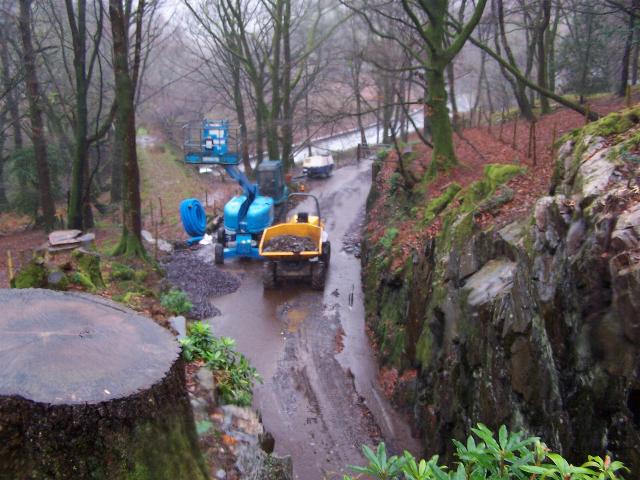
These southerly views (19/3/05, 10/12/06, 23/12/06 and 20/1/07) show the entrance to the Goat Tunnel, long obscured by undergrowth. Some rockwork is required here as a fallen slab can be seen to the right in the first view. The former aqueduct is visible lying on the ground to the left and the water thus entering the cutting has made it very boggy in this area. A start was made in early December but heavy rain caused flooding from the aqueduct spillway in the second view. In the third view the portal and the adjacent rock has been shotcreted. The fourth view shows extensive rockwork underway from a cherry-picker with pinning of galvanised netting,, shotcreting and rock bolts. Click on the images to enlarge. These images are copyright B.W.Hughes and were captured on a Kodak DX6490 digital camera. The fourth image is copyright Dave Waldren and was taken on a Cannon G2 digital camera. Images post processed using Iphoto+4 and displayed at 96dpi.
This southerly view (22/3/07) shows drainage being completed in Goat Cutting with a trough on the western side. Click on the image to enlarge. This image is courtesy/copyright John Ewing and was taken on a digital camera. Image post processed using iPhoto Plus4 and displayed at 96dpi.
This northerly view (20/1/07) shows Goat Cutting on the northern approach to Goat Tunnel. The cherry-picker has been used to pin galvanised wire mesh to the rock faces to retain loose material. Some rock bolts have also been placed and shotcrete has been used to stabilise the portal area. When finished, drainage will be completed through the tunnel drying out this very wet cutting. Click on the image to enlarge. This image is courtesy Dave Waldren and was taken on a Canon G2 digital camera. Image post processed using iPhoto Plus4 and displayed at 96dpi.


These northerly views (10/12/06, 8/2/07 and 15/3/07) show Goat Cutting as seen from the former Goat Hotel reservoir. In the first view, the incessant downpour had led to some flooding in the cutting. In the second rare snow view the eastern cutting side has been cleared and temporary fencing was in place for the Oberon Wood properties. The third view shows all the trees on railway land have now been chopped down. Click on the images to enlarge. The first image is copyright B.W.Hughes and was taken on a Kodak DX6490 digital camera. The second image is courtesy/copyright John Ewing and was taken on a digital camera. The third image is courtesy Mike Jenkins, courtesy Dave Waldren and was taken on a digital camera. Image post processed using iPhoto Plus4 and displayed at 96dpi.

This northerly view (29/3/07) shows the placing of pre-cast trough sections concreted against the rock face of the western side of Goat Cutting. Click on the image to enlarge. This image is copyright Mike Jenkins and was taken on a digital camera. Image post processed using iPhoto Plus4 and displayed at 96dpi.
This northerly view (7/4/07) shows the completion of drainage in Goat Cutting. The concrete trough sections have been cemented against the rock face on the west side. Fencing still remains to be erected as a permanent boundary to Oberon Wood properties. Click on the image to enlarge. This image is courtesy/copyright John Ewing and was taken on a digital camera. Image post processed using iPhoto Plus4 and displayed at 96dpi.
These northerly views (19/3/05 and 22/3/07) shows the Goat Cutting footbridge from near the Goat Tunnel entrance, courtesy of special permission to access the trackbed from WHRCL, with initial clearance complete. The second view shows the trackbed nearing completion. Click on the image to enlarge. The first image is copyright B.W.Hughes and was captured on a Kodak DX6490 digital camera. The second image is courtesy/copyright John Ewing and was taken on a digital camera. Images post processed using iPhoto Plus4 and displayed at 96dpi.
This southerly view (19/3/05) shows the Goat Tunnel entrance from the trackbed, courtesy of special permission to access the trackbed from WHRCL. The portal requires some rock work as a loose slab has fallen in recent years. This area is very wet as the former aqueduct has collapsed and the former Goat Reservoir overflow feeds into the cutting as a result. Click on the image to enlarge. This image is copyright B.W.Hughes and was captured on a Kodak DX6490 digital camera. Image post processed using Iphoto+4 and displayed at 96dpi.

These northerly views (10/12/06 and 21/2/07) shows the Goat Tunnel approach cutting now cleared. The incessant downpour had led to the old Goat Hotel reservoir flooding the cutting. An aqueduct used to carry this across the cutting. The second view shows tree clearance has occurred and rock netting applied. The Oberon Wood estate properties need permanent fencing. Click on the images to enlarge. The first image is copyright B.W.Hughes and was taken on a Kodak DX6490 digital camera. The second image is courtesy Dave Waldren and copyright Mike Jenkins and was taken on a digital camera. Images post processed using iPhoto Plus4 and displayed at 96dpi.
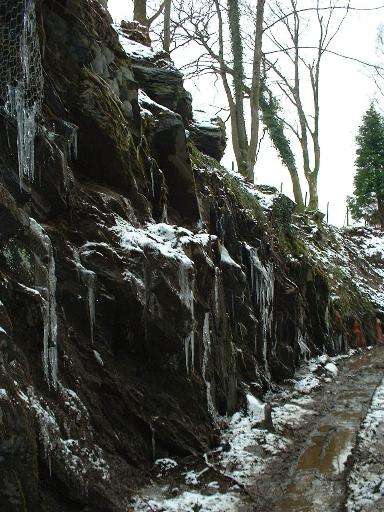
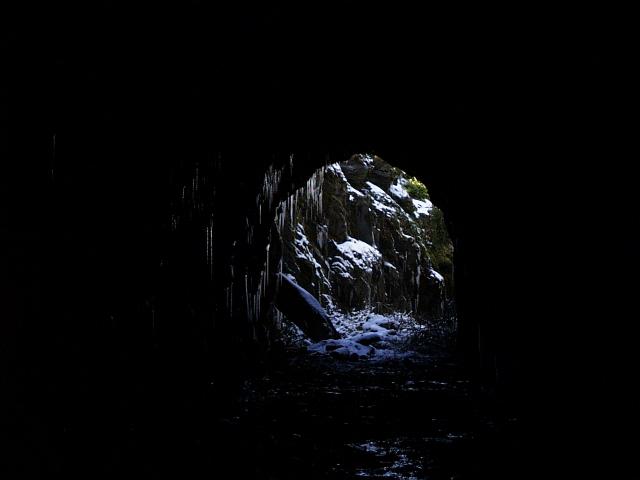
This northerly view (8/2/07) shows icicles immediately north of Goat Tunnel. Work is still underway in this area. Click on the image to enlarge. This image is courtesy/copyright John Ewing and was taken on a digital camera. Image post processed using iPhoto Plus4 and displayed at 96dpi.

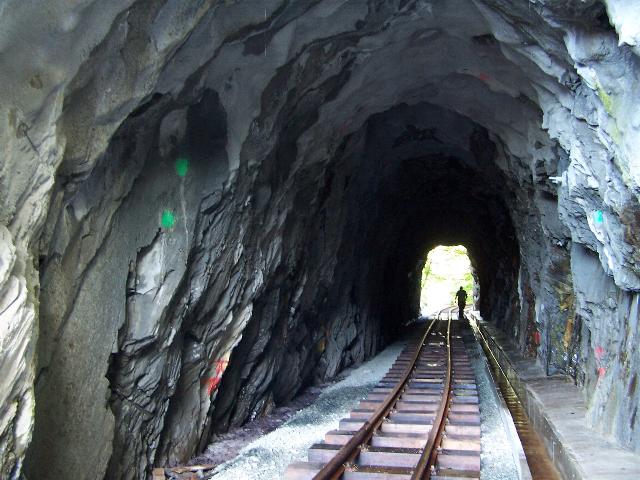
This view (21/7/04) inside the 38m long Goat Tunnel shows a conical cavity in the roof with brown boulder clay visible in the top left. Click on the image to enlarge. This image is copyright Mike Schumann and was taken on a digital camera. Image post processed using iPhoto Plus4 and displayed at 96dpi.

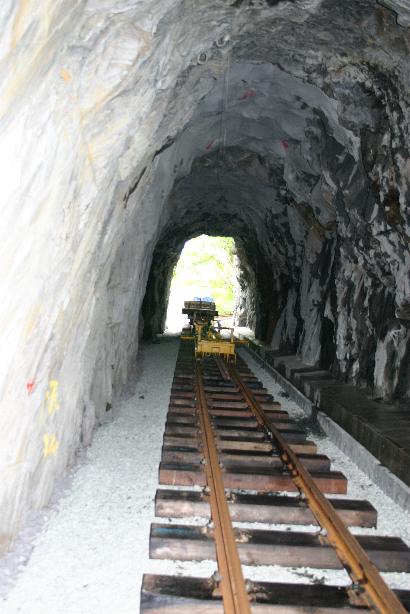
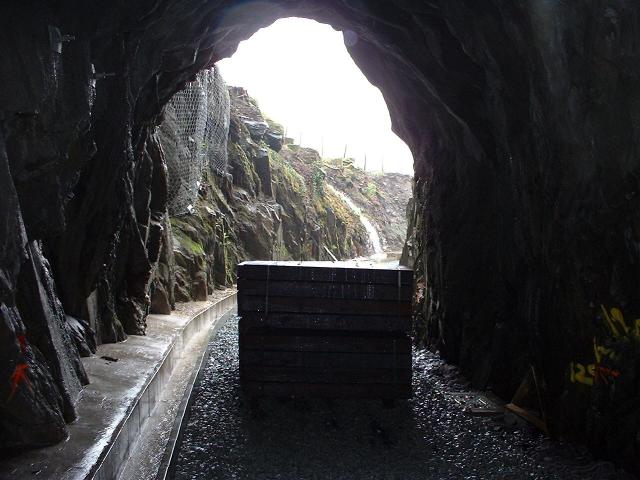
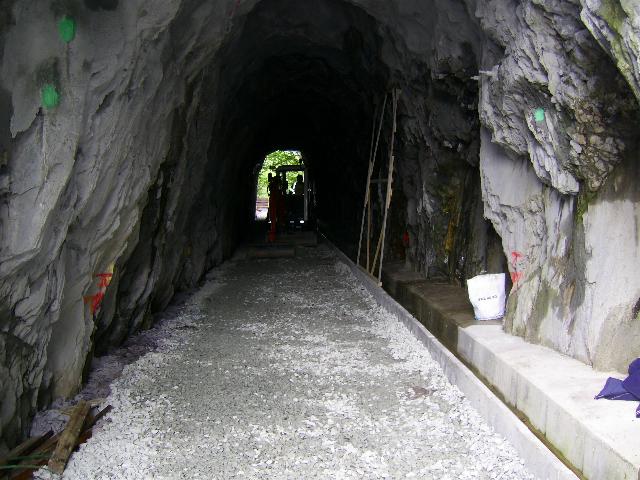
These northerly and southerly views respectively (21/7/04 and 5/5/07) show the interior of the 38m long Goat Tunnel. The first shows the original state of the tunnel with the sharp right hand bend at the north end into Goat Cutting. Telephone insulators are visible in the roof. The second shows the track laid inside Goat Tunnel and shotcrete added to the roof during the recent rock engineers contract. The new drainage channel is on the west side. Click on the images to enlarge. The first image is copyright Mike Schumann and was taken on a digital camera. The second image is copyright Simon Melhuish and was taken on a Canon EOS 300D digital camera. Image post processed using iPhoto Plus4 and displayed at 96dpi.
This southerly view (20/5/07) from the north portal of Goat Tunnel shows surveyors have marked the tunnel walls ready to improve clearance to the required gauge. Click on the image to enlarge. This image is copyright B.W.Hughes and was taken on a Kodak DX6490 digital camera. Image post processed using iPhoto Plus4 and displayed at 96dpi.
This southerly view (4/3/06) shows the snowy north portal of the Goat Tunnel, complete with icicles. Click on the image to enlarge. This image is courtesy Kim Winter and was taken on an Olympus Camedia C-1400XL 1.4 million Pixels Progressive CCD 3 x Progressive. Image post processed using iPhoto Plus4 and displayed at 96dpi.
These northerly views (two from 4/3/06 24,4,07 and 27/4/07) show Goat Tunnel. In the first two views icicles are visible and logs cut to clear the south approach cutting. The third view shows ballast laid and piles of wooden sleepers. The fourth view shows track being laid in the tunnel. Click on the images to enlarge. The first two images are courtesy Kim Winter and were taken on an Olympus Camedia C-1400XL 1.4 million Pixels Progressive CCD 3 x Progressive. The third image is copyright John Ewing and was taken on a digital camera. The fourth view is copyright Tim Evans and was taken on a digital camera. Images post processed using iPhoto Plus4 and displayed at 96dpi.
This southerly view (24/4/07) shows the completed ballasting to the south end of Goat Tunnel. Ballasting will resume from the Bryn-y-felin end to allow the tracklayers to progress through the tunnel as far as Cemetery Crossing later this week. Click on the image to enlarge. This image is courtesy/copyright John Ewing and was taken on a digital camera. Image post processed using iPhoto Plus4 and displayed at 96dpi.
Goat Tunnel rectification works
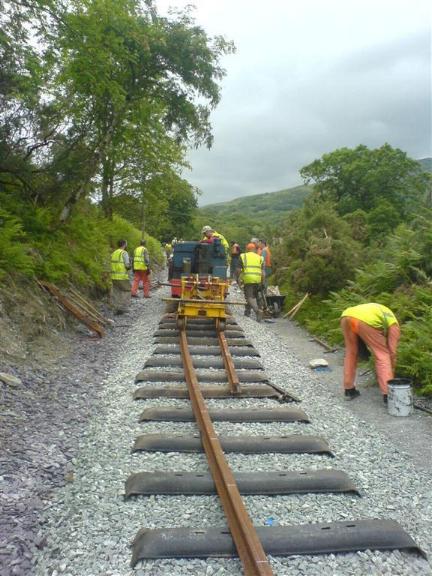
When the first train tried to go through Goat Tunnel the ex-SAR brakevan scraped the roof on the bend as it entered the tunnel. A plan was developed to reduce the level of track through the tunnel rather than excavate more rock as experts had determined that had determined that removing rock might cause instability. Track was removed over the weekend of 16-17/6/07 and the excavators got to work removing the ballast and sub base to create about 30cm reduction in height. It has been decided to change to steel sleepers in the tunnel which will also reduce levels.
Rectification works in Goat Tunnel were completed and the ballast bed restored ready for tracklaying to recommence on 30/6/07. It appears the ballast bed has been reduced by as much as 30cm. Surveying was underway on 28/6/07 in order to finalise the new alignment through the tunnel and set out the pegs for the tracklayers' offsets.
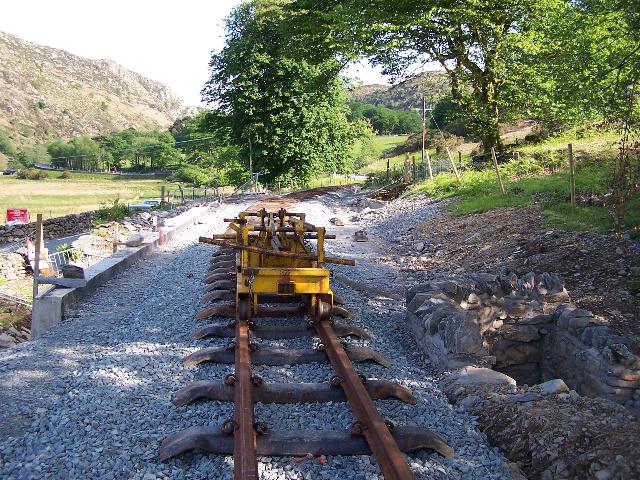
These northerly and southerly views (28/6/07 and 19/6/07) show the reduction in height of the ballast bed achieved by the rectification works. In the first view surveyors can be seen checking the final alignment and levels. In the second view, a small excavator and dumper are at work in Goat Tunnel, removing the ballast. The gauge frame is visible to the right. Click on the images to enlarge. These images are courtesy Alasdair Stewart (WHRCL) and were taken on a digital camera. Images post processed using iPhoto Plus4 and displayed at 96dpi.

This southerly view (28/6/07) shows the reduced trackbed through Goat Tunnel being subject to a final survey. Click on the image to enlarge. This image is courtesy Alasdair Stewart (WHRCL) and was taken on a digital camera. Image post processed using iPhoto Plus4 and displayed at 96dpi.
Goat Tunnel south to Bryn-y-felin
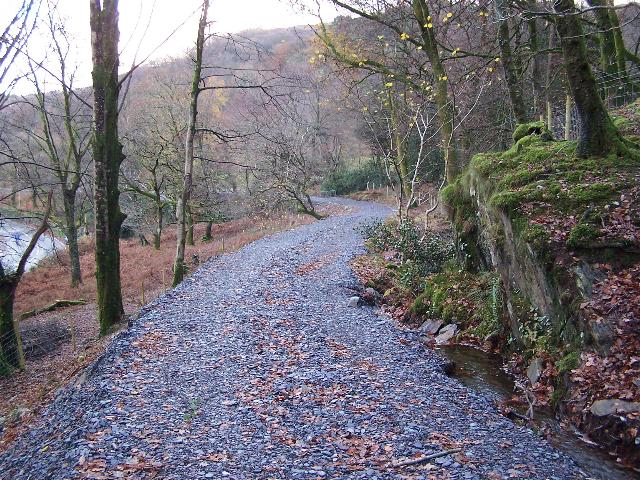
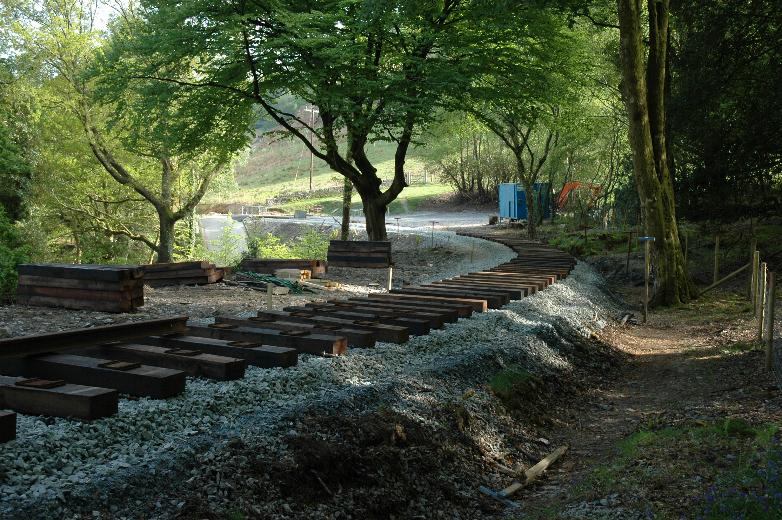
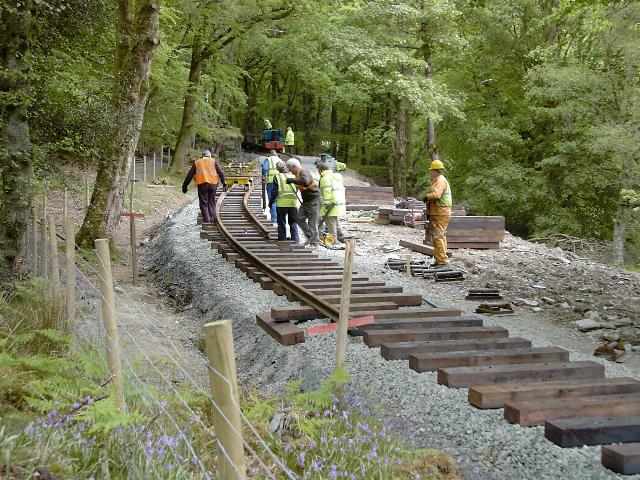
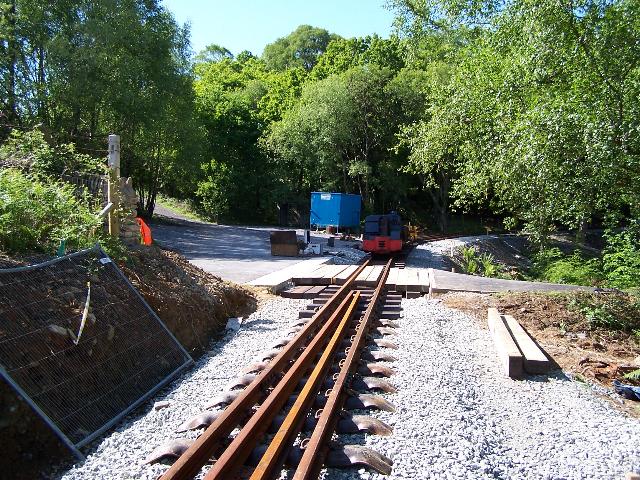
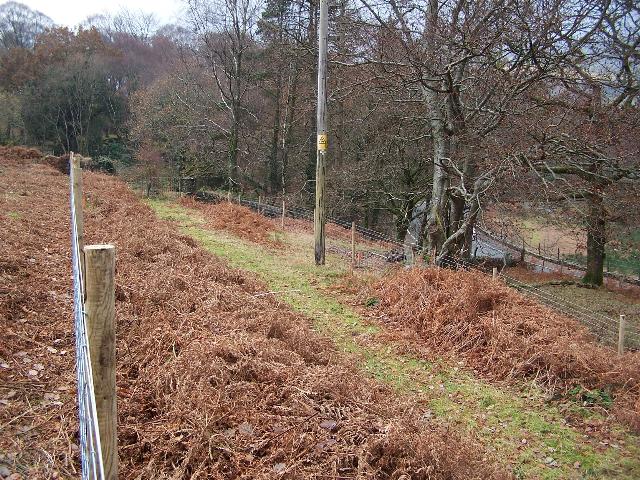
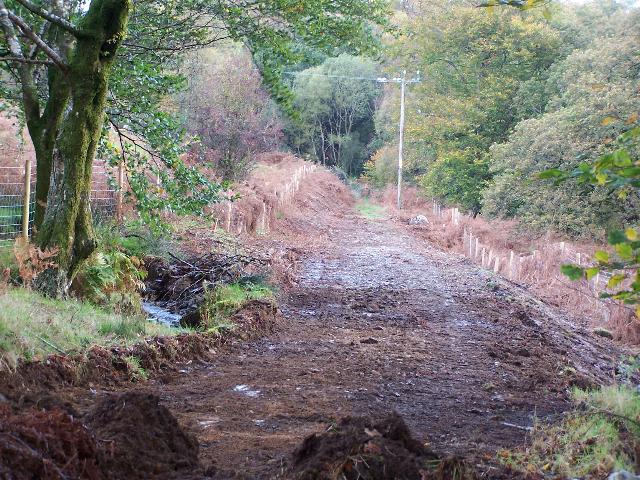
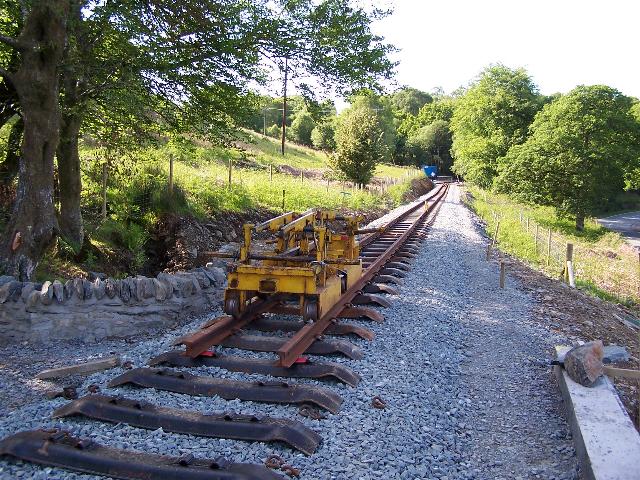
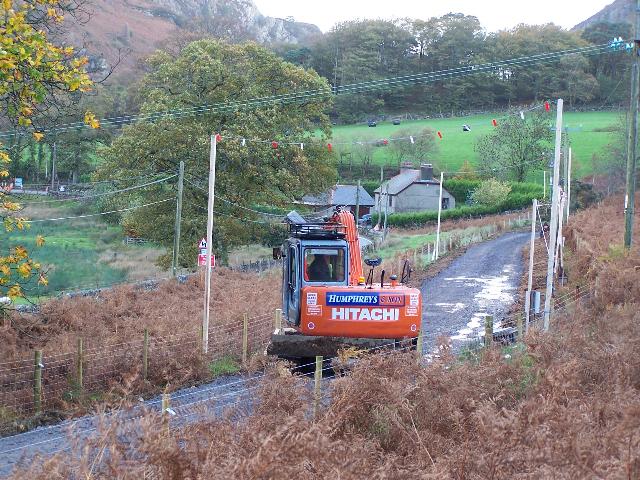
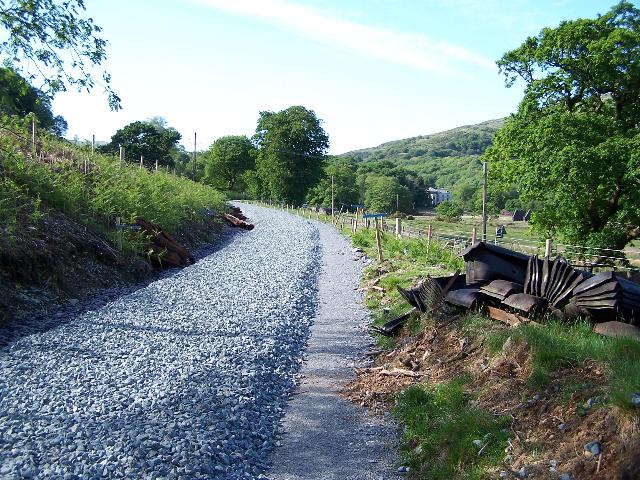
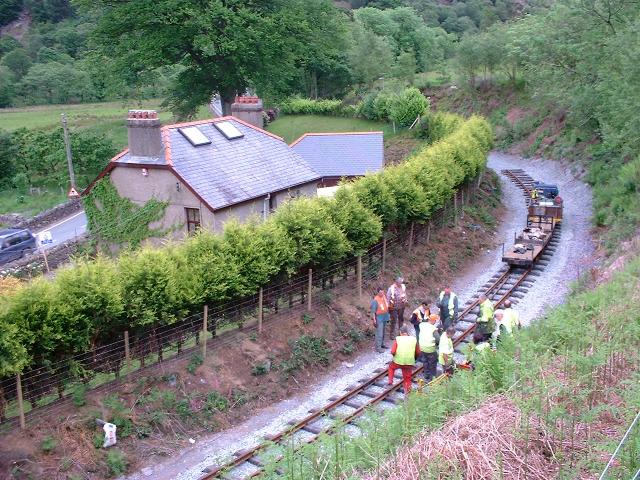
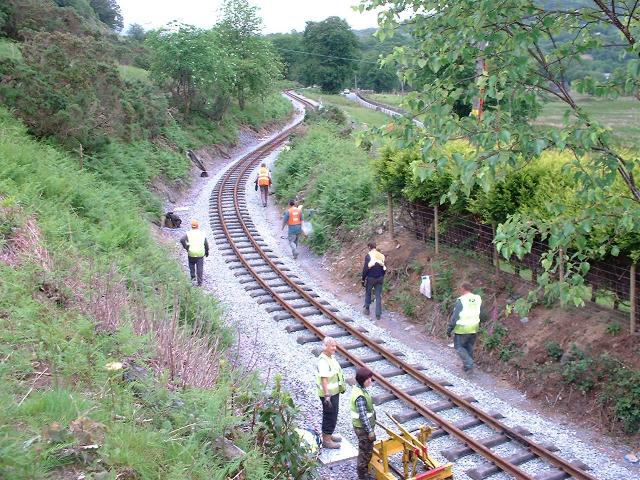
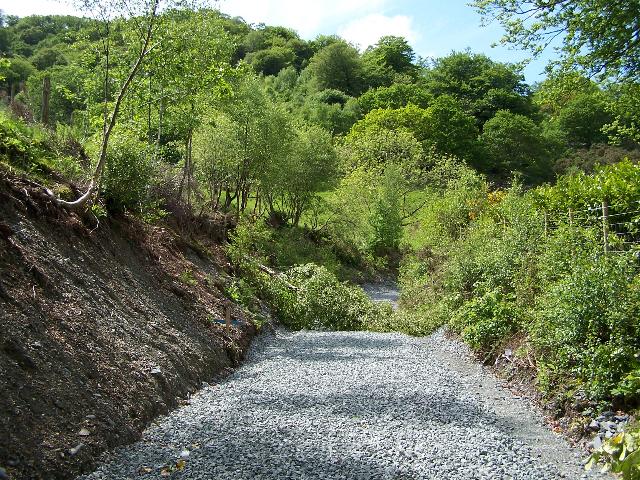
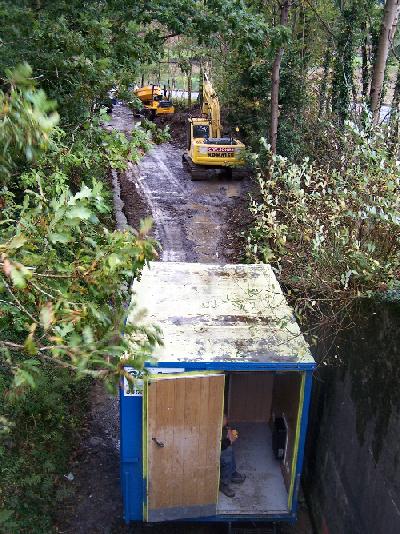
The section south of Goat Tunnel to Bryn-y-felin (Section 8) was let to William Hughes on 20/10/06 and work started the following week. The contractor was making rapid progress on 31/10/06 with the trackbed cleared north from Bryn-y-felin almost as far as the Cemetery Crossing and hardened as far as LC89. This public footpath that crosses the line here gives good views of the construction work and runs both north and south above the line, connecting to both Beddgelert Station and the Aberglaslyn Pass. In mid November, the first stage of trackwork was complete and the trackbed was good enough for vehicles to pass. By 26/11/06, a cherry-picker was undertaking rock stabilisation work on the south cutting at Goat Tunnel using the trackbed to gain access from Bryn-y-felin.

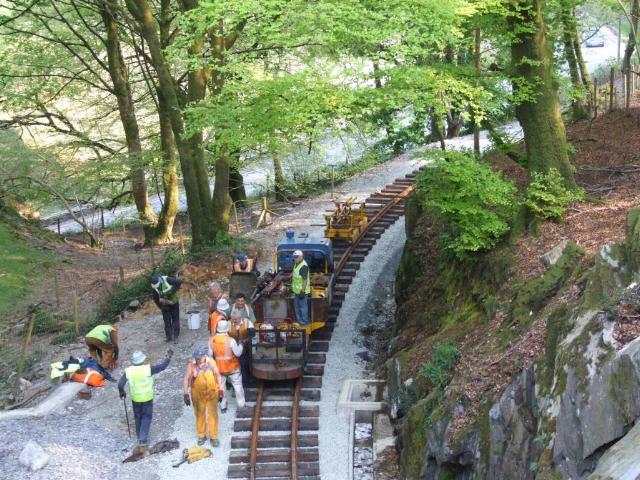
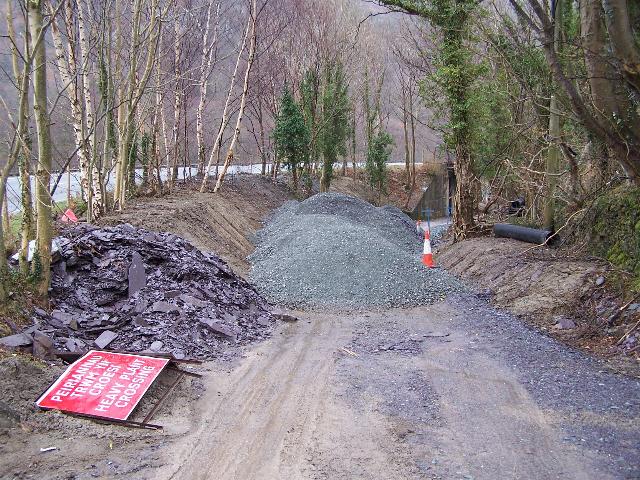
These southerly views (10/12/06, 23/12/06, 28/4/07 and 29/4/07) show the south approach cutting to Goat Tunnel. In the first image the cherry picker is in action for rock work and blue French drainage pipe is being installed. The route of the former PBSSR, 'bridge to nowhere', can be seen going straight on to the left of the cherry picker, while the later WHR route curves sharply to the right. In the second view rock stabilisation work is nearing completion on the cutting sides. The third image shows the ballast bed laid and the fourth, the track laid with Dolgarrog on the PW train. Click on the images to enlarge. The first two images are copyright B.W.Hughes and were taken on a Kodak DX6490 digital camera. The third image is copyright Laurence Armstrong and was taken on a digital camera. The fourth image is copyright Ben Fisher and were taken on a digital camera. Images post processed using iPhoto Plus4 and displayed at 96dpi.
This southerly view (2/3/07) shows work on the south exit of Goat Tunnel nearing completion. a drainage ditch has been excavated along the right hand side and a new culvert has been completed to drain this water at the south end of the cutting. Rock work now appears complete. Click on the image to enlarge. This image is copyright Chris Price and was taken on a digital camera. Image post processed using iPhoto Plus4 and displayed at 96dpi.


These northerly views (archive, 20/1/07 and 21/2/07) show firstly the south portal of the Goat Tunnel in Oberon Wood as viewed from the never-used PBSSR bridge over the main road. The WHR curves sharply to the left to run on a valleyside shelf above the main road and is already a metre higher than the PBSSR where the two formations separate. The PBSSR had steeper gradients than the WHR as electric traction was planned. The second view shows the trackbed cleared and widened allowing access for rock stabilisation work. The third view shows the rock engineer has pinned galvanised netting to the loose rock and shotcreted and rock bolted the portal area. The fourth view shows the drainage ditch completed and the formation widened on the curve with slate waste visible in the foreground. Click on the images to enlarge. These images are copyright B.W.Hughes. Slide scan technology utilised is Olympus ES10. Slide scanned at 200dpi. The second image is copyright B.W.Hughes and were taken on a Kodak DX6490 digital camera. The third image is courtesy Dave Waldren and was taken on a Canon G2 digital camera. The fourth image is courtesy Dave Waldren and copyright Mike Jenkins and was taken on a digital camera. Images post processed using iPhoto Plus4 and displayed at 96dpi.

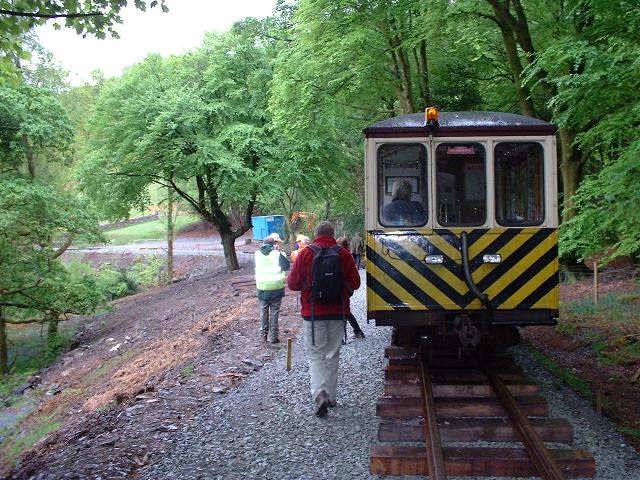
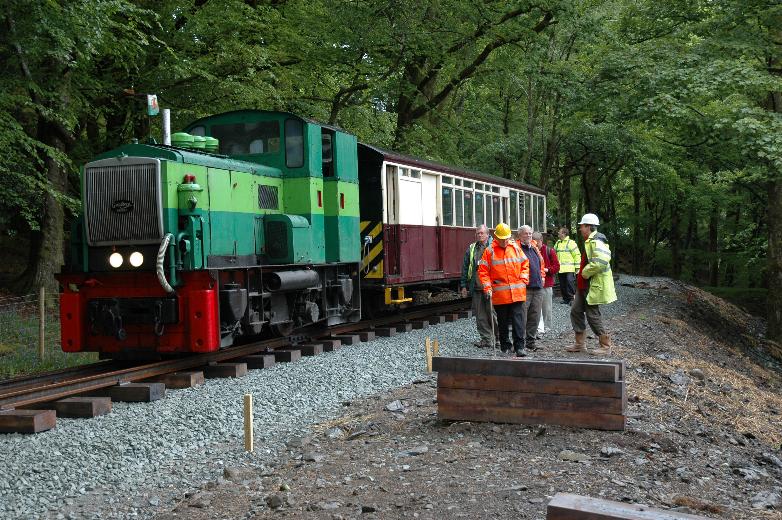
These northerly views (22/3/07, 28/4/07 and 29/4/07) shows the south end of Goat Tunnel with the drainage trough visible on the western side. The second view shows rock bolting, netting and concrete supports added during the recent rock engineers contract. Dolgarrog is at the Head of Steel with Upnor Castle attempting an unsuccessful transit of the tunnel with the Phase 4 PW train. The SAR van proved out of gauge. Click on the images to enlarge. The first image is courtesy/copyright John Ewing and was taken on a digital camera. The second image is copyright Lawrence Armstrong and was taken on a digital camera. The third view copyright Ben Fisher and was taken on a digital camera. Images post processed using iPhoto Plus4 and displayed at 96dpi.
These northerly views (26/11/06 and 20/5/07) shows the trackbed finished then the track laid but encroaching on the drainage ditch to the left halfway round Cemetery Curve. Click on the images to enlarge. These images are copyright B.W.Hughes and were taken on a Kodak DX6490 digital camera. Image post processed using iPhoto Plus4 and displayed at 96dpi.
These southerly views (archive, 26/11/06, 22/3/07 and 5/5/07) show firstly the WHR curving sharply south from the Goat Tunnel portal. The abandoned incomplete works of the PBSSR are seen to the left crossing the main road on a bridge. The second view shows the formation cleared, widened and hardened with slate waste at Ch.22650, Parc Bach Curve in Oberon Wood, with the curves for Cemetery Crossing LC88 in the background. The third image shows the formation now completed with drainage and the fourth, ballast laid and wooden sleepered track at the Head of Steel. Click on the images to enlarge. The first two images are copyright B.W.Hughes. Slide scan technology utilised is Olympus ES10. Slide scanned at 200dpi. The second image was taken on a Kodak DX6490 digital camera. The third and fourth images are courtesy/copyright John Ewing and was taken on a digital camera. Images post processed using iPhoto Plus4 and displayed at 96dpi.
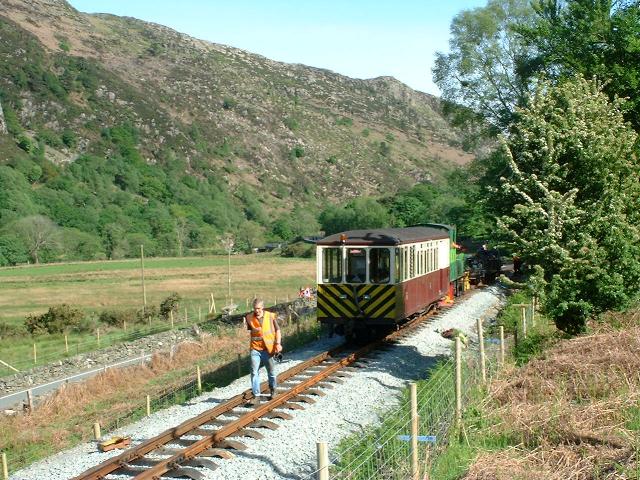
This southerly view (7/5/07) shows the Directors' Special on the curve just north of LC88, Cemetery Crossing. Coach No.1000 has had various alterations including a brake setter for when it is propelled, a flashing amber light, a horn, lighting for working in tunnels/at night and wasp stripes. Click on the image to enlarge. This image is courtesy/copyright John Ewing and was taken on a Fuji Finepix 1400 digital camera. Image post processed using iPhoto Plus4 and displayed at 96dpi.

These northerly views (22/2/05 and 6/5/07) show the 1923 deviation above the A498, between the Goat Tunnel and the Cemetery Crossing at UB169. In the first view the area has been recently fenced. The second view shows the Head of Steel north of LC88, Cemetery Crossing, at the end of the weekend. Click on the images to enlarge. The first image is copyright B.W.Hughes and was captured on a Kodak DX6490 digital camera. The second image is courtesy John McNeil and was taken on a Kyocera S3 digital camera. Images post processed using iPhoto Plus4 and displayed at 96dpi.
This northerly view (7/5/07) shows Upnor Castle with coach No.1000 the Directors' Special having come through Goat Tunnel. Close inspection of the track shows that only every other sleeper has a chair due to shortage of track materials. Click on the image to enlarge. This image is copyright Jane Ewing and was taken on a Nikon D70 digital camera. Image post processed using iPhoto Plus4 and displayed at 96dpi.
Click here for more details on the PBSSR.
Cemetery Crossing
The railway crosses the access to Beddgelert Cemetery. The WHR Liquidator was advised of the Public Enquiry to build the new Beddgelert Cemetery in November 1944. The cemetery was clearly built after the railway closed but the council put in waybeams and a l/c to allow for the possibility of restoration of the WHR. In fact maps (recently removed) in Beddgelert car park showed the railway under construction from Beddgelert down the Aberglaslyn Pass, revealing how GCC encouraged an earlier restoration scheme.
These southerly views (22/2/06, 26/11/06 and 27/4/07) show the 1923 deviation above the A498, between the Goat Tunnel and the Cemetery Crossing (LC88), visible in the distance, from UB169. This area had been recently cleared of scrub in the first view. The second view shows the trackbed completed to full width over UB169. The trackbed from Bryn-y-felin was being used for access for the Goat Tunnel rock works contract. The third view shows the ballast has reached a point immediately north of LC88 (TWA Ch.22780). Click on the image to enlarge. The first two images are copyright B.W.Hughes and were taken on a Kodak DX6490 digital camera. The third image is courtesy/copyright John Ewing and was taken on a digital camera. Images post processed using iPhoto Plus4 and displayed at 96dp.

These northerly view (20/2/01, 26/11/06 and 7/5/07) show the Beddgelert Cemetery access road climbing the hillside in a bend at LC88 (Ch.22800). This is a new level crossing put in when the cemetery was constructed believed to be in the 1960s. A public bridleway also runs across LC88. The railway curves right along the hillside and then left into the Goat Tunnel. This second view shows the formation cleared, widened and hardened with slate waste. The third view shows the new catch-pit and temporary wooden crossing timbers. Click on the images to enlarge. The first image is copyright B.W.Hughes. Slide scan technology utilised is Olympus ES10. Slide scanned at 200dpi. The second image is copyright B.W.Hughes and was taken on a Kodak DX6490 digital camera. The third image is courtesy/copyright John Ewing and was taken on a Nikon D70 digital camera. Images post processed using iPhoto Plus4 and displayed at 96dpi.
This northerly view (20/5/07) from just south of LC88 shows Dolgarrog standing just north of the crossing. Click on the image to enlarge. This image is copyright B.W.Hughes and was taken on a Kodak DX6490 digital camera. Image post processed using iPhoto Plus4 and displayed at 96dpi.
This southerly view (20/2/01) shows the WHR alignment passing through the cemetery wall where a fir tree has grown in the last 30 years or so since this l/c was constructed. The railway continues south on the hillside above the main road. Click on the image to enlarge. This image is copyright B.W.Hughes. Slide scan technology utilised is Olympus ES10 & iPhoto Plus4. Slide scanned at 200dpi.

These southerly views (19/3/05, 11/12/05 and 20/5/07) show the view from LC88. In the first, the fir tree has now been cut down. The trackbed has been fenced in the second view. The electricity pole will need to be moved clear of the trackbed. In the third, the track has been laid and the wall cut back to improve visibility at this rarely used vehicle crossing. Click on the images to enlarge. These images are copyright B.W.Hughes and were captured on a Kodak DX6490 digital camera. Images post processed using Iphoto+4 and displayed at 96dpi.

These southerly views respectively (28/3/07 and 7/5/07) show LC88, Cemetery Crossing with the completion of the trackbed. The second view shows the new catch-pit and tarmac. There is no ballast south of the crossing yet. Click on the images to enlarge. The first image is courtesy Alastair Stewart (WHRCL) and was taken on a digital camera. The second image is copyright John Ewing (WHRCL) and was taken on a Nikon D70 digital camera. Images post processed using iPhoto Plus4 and displayed at 96dpi.

These southerly views (29/10/06 and 26/11/06) from Cemetery Crossing LC88 show clearance of the trackbed northwards from Bryn-y-felin has already reached UB170, a new sheep creep at Ch22850. The second view shows the formation cleared, widened and hardened with slate waste at Ch.22800, looking south from Cemetery Crossing. Some work is needed to build up the levels on this section, which is a little undulating. Click on the images to enlarge. These images are copyright B.W.Hughes and were taken on a Kodak DX6490 digital camera. Images post processed using iPhoto Plus4 and displayed at 96dpi.

These easterly views (12/9/04 and 20/5/07) show the level crossing at LC88 from the bridleway gate just above this point. The second view shows Upnor Castle crossing LC88, Cemetery Crossing, for the first time. Click on the image to enlarge. This image is copyright B.W.Hughes. Image captured using a Concord 3340z digital camera. The second view was taken on a Kodak DX6490 digital camera. Image post processed using iPhoto Plus4 and displayed at 96dpi.
These northerly views (31/3/05, 11/12/05 and 20/5/07) just south of LC88, the Cemetery Crossing, show the trackbed now cleared and shrubbery mulched. The second view shows the route fenced and an electric pole that will need to be moved off the alignment. The third view shows Upnor Castle crossing the level crossing for the first time (minus SAR brakevan!). Click on the image to enlarge. These images are copyright B.W.Hughes and were captured on a Kodak DX6490 digital camera. Images post processed using Iphoto+4 and displayed at 96dpi.
These southerly views (11/12/05 and 20/5/07) at Ch.22850 shows the trackbed as a shelf approaching LC89. The second view shows the track just laid and Upnor Castle advancing to the Head of Steel at UB172 for the first time. Click on the images to enlarge. The first image is copyright B.W.Hughes and was taken on a Kodak DX6490 digital camera. The second image is courtesy/copyright John Ewing and was taken on a Fuji Finepix 1400 digital camera. Images post processed using iPhoto Plus4 and displayed at 96dpi.


These northerly views (31/3/05, 11/12/05, 31/10/06 and 24/2/07) from LC89 show the trackbed as a shelf approaching Beddgelert. The second view shows the route fenced and the third view clearance and levelling work started. The fourth view shows the trackbed finished in slate fines. Click on the images to enlarge. The first three images are copyright B.W.Hughes and were captured on a Kodak DX6490 digital camera. The fourth image is courtesy Mike Hart. Images post processed using Iphoto+4 and displayed at 96dpi.
UB171/2
These northerly and southerly views respectively (20/5/07) show the Head of Steel at that end of that weekend's tracklaying at UB171, just south of LC89. Click on the image to enlarge. This image is copyright B.W.Hughes and was taken on a Kodak DX6490 digital camera. Image post processed using iPhoto Plus4 and displayed at 96dpi.
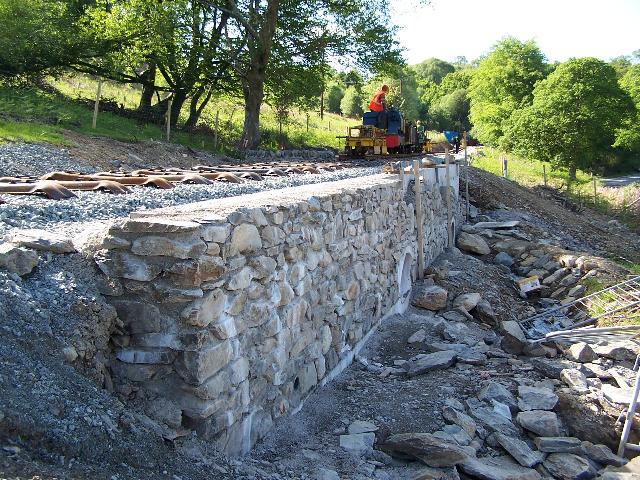
This northerly view (21/5/07) shows the stonemason has been cladding the combined headwall for UB171/2, with the Head of Steel just visible to the right. Click on the image to enlarge. This image is courtesy Alasdair Stewart (WHRCL) and was taken on a digital camera. Image post processed using iPhoto Plus4 and displayed at 96dpi.


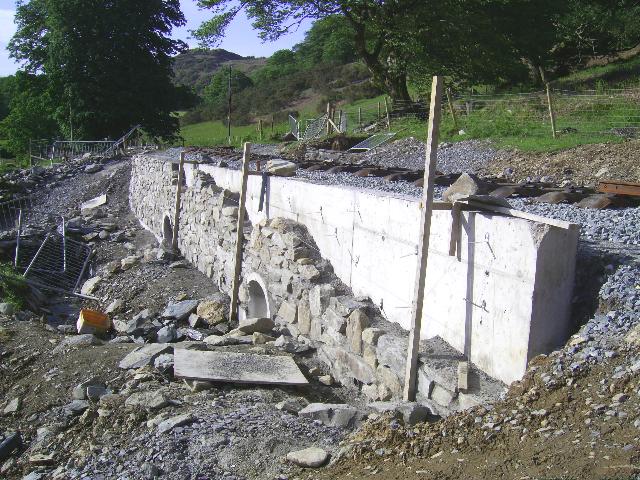
These northerly views (25/2/07, 24/3/07, 20/5/07 and 31/5/07) show culverts UB171/2 nearing completion at LC89. North and south of this point the trackbed has been rolled with slate fines. The second view shows the completed retaining wall for the trackbed. This very public location alongside the A498 Aberglaslyn road will have local stone facing added soon on the ledge visible. The third view shows Dolgarrog at the Head of Steel on UB171 with the local stone cladding being added. The fourth view shows engineers considering final arrangements to the footpath crossing. Click on the images to enlarge. The first image is courtesy/copyright Mike Hart and was taken on a digital camera. The second and third images are copyright B.W.Hughes and were taken on a Kodak DX6490 digital camera. The fourth image is courtesy/copyright John Ewing and was taken on a Fuji Finepix 1400 digital camera. Images post processed using iPhoto Plus4 and displayed at 96dpi.
This northerly view (22/3/07) shows the completed formation over the new UB171/2 alongside the main road just north of Bryn-y-felin. Click on the image to enlarge. This image is courtesy/copyright John Ewing and was taken on a digital camera. Image post processed using iPhoto Plus4 and displayed at 96dpi.


These southerly views (11/9/04, 11/12/05, 31/10/06 and 24/2/07) show the level crossing at LC89, just south of Beddgelert Cemetery, from the new way-marked public footpath that crosses the railway at this point. The second view shows the trackbed fenced. The third view shows the trackbed cleared and hardened with slate waste. Click on the image to enlarge. The first image is copyright R. J. Edwards captured using an Olympus digital camera. The second and third images are copyright B.W.Hughes and were captured on a Kodak DX6490 digital camera. The fourth image is courtesy Mike Hart. Images post processed using Iphoto+4 and displayed at 96dpi.
Bryn-y-felin approaches
The railway curves behind Bryn-y-felin cottage and under the A498 road bridge before crossing the Afon Glaslyn. Bryn-y-felin house is dated 1910 and the original owner must have been upset when, after the abandonment of the PBSSR around 1906, the WHR was diverted from the PBSSR Gelert's Grave route to pass immediately behind his house from 1923!
This northerly view (31/3/05 and 20/5/07) at Ch.23000 shows the indistinct trackbed on the hillside north of Bryn-y-felin Cutting just beyond the electricity pole, with a pile of wood mulch at the top left. The second view shows the ballasted railway just south of LC172 as seen from the public footpath that climbs the hillside. It was expected that track would be laid here 26-7/5/07. Click on the image to enlarge. This image is copyright B.W.Hughes and was captured on a Kodak DX6490 digital camera. Image post processed using Iphoto+4 and displayed at 96dpi.

These southerly views (31/3/05, 11/12/05, 31/10/06 and 7/5/07) from Ch.23000 shows the trackbed as an indistinct shelf approaching Bryn-y-felin house to the left of the electricity pole. The second view shows the route fenced and the third view the route cleared and the trackbed strengthened. The fourth view shows the trackbed complete with sub base and sleepers laid out prior to ballasting in mid May. Click on the images to enlarge. The first three images are copyright B.W.Hughes and were captured on a Kodak DX6490 digital camera. The fourth image is courtesy/copyright John Ewing and was taken on a Fuji Finepix 1400 digital camera. Images post processed using iPhoto Plus4 and displayed at 96dpi.
This southerly view (20/5/07) shows the ballasted railway just south of LC172 as seen from the public footpath that climbs the hillside. It was expected that track would be laid here 26-7/5/07. Click on the image to enlarge. This image is copyright B.W.Hughes and was taken on a Kodak DX6490 digital camera. Image post processed using iPhoto Plus4 and displayed at 96dpi.
These northerly and southerly views (both 20/5/07) show the trackbed ballasted at UB172a, with Bryn-y-felin curve visible in the distance. Sleepers have been positioned and track was expected to be laid past here on 26-7/5/07. Click on the images to enlarge. These images are copyright B.W.Hughes and were captured on an Olympus and a Kodak DX6490 digital camera. Images post processed using Iphoto+4 and displayed at 96dpi.

These southerly views (11/9/04 and 31/3/05) from the public footpath above Bryn-y-felin cutting show progress with clearance and mulching. Brown patches of wood mulch have been scattered on the sides of the cutting. Click on the image to enlarge. These images are copyright R.J.Edwards and B.W.Hughes and were captured on an Olympus and a Kodak DX6490 digital camera. Images post processed using Iphoto+4 and displayed at 96dpi.
This northerly roadside view (29/4/01) shows the alignment of the railway as a line of gorse bushes running along the hillside just above the main road. To the left are buildings of the Bryn-y-felin cottage. Click on the image to enlarge. This image is copyright B.W.Hughes. Slide scan technology utilised is Olympus ES10 & iPhoto Plus4. Slide scanned at 200dpi.
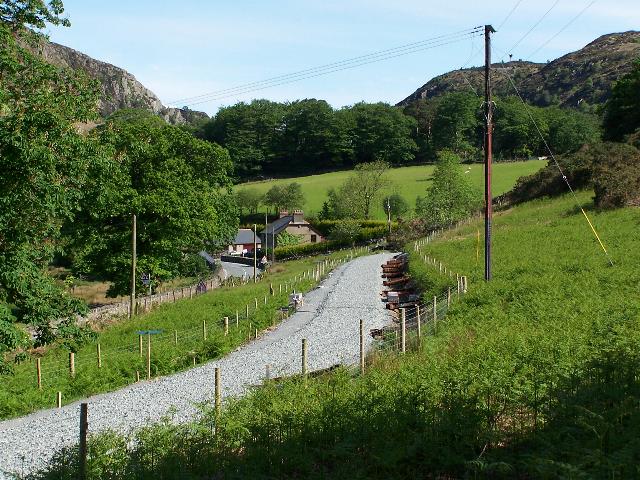
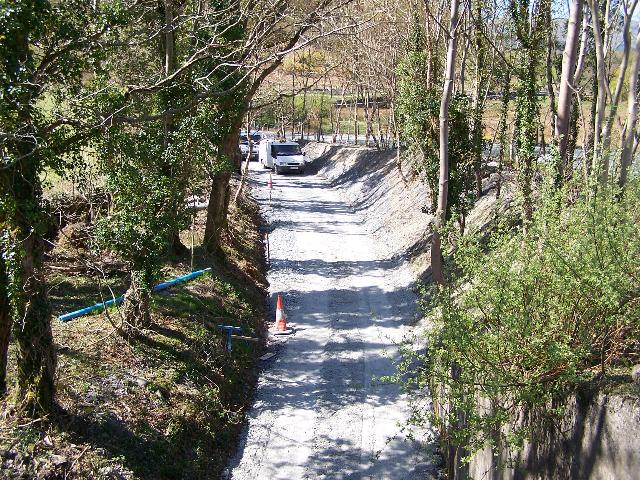
This northerly view (11/5/07) shows ballasting of the 400m section between LC88 and Bryn-y-felin. Click on the image to enlarge. This image is copyright Colin Lea and was taken on a digital camera. Images post processed using iPhoto Plus4 and displayed at 96dpi.
This northerly view (20/5/07) shows the ballasted railway at the north end of Bryn-y-felin Cutting with ex-SAR sleepers stacked ready for a gauge widened curve. Click on the image to enlarge. This image is copyright B.W.Hughes and was taken on a Kodak DX6490 digital camera. Image post processed using iPhoto Plus4 and displayed at 96dpi.
This northerly view (2/6/07) shows Dolgarrog in Bryn-y-felin Cutting. Click on the image to enlarge. This image is courtesy/copyright Rob Bradley and was taken on a digital camera. Image post processed using iPhoto Plus4 and displayed at 96dpi.

These southerly views (20/5/07 and 3/6/07) show the ballasted railway at the north end of Bryn-y-felin Cutting. The second view shows the Head of Steel. Click on the images to enlarge. The owner of the 1910 built Bryn-y-felin house has planted a screen of trees and put the house up for sale. The first image is copyright B.W.Hughes and was taken on a Kodak DX6490 digital camera. The second image is courtesy/copyright John Ewing and was taken on a Fuji Finepix 1400 digital camera. Image post processed using iPhoto Plus4 and displayed at 96dpi.
These northerly views (20/5/07 and 3/6/07) from the middle of Bryn-y-felin Cutting shows the ballasted railway. The second view shows track being laid. Click on the images to enlarge. The first image is copyright B.W.Hughes and was taken on a Kodak DX6490 digital camera. The second image is courtesy/copyright John Ewing and was taken on a Fuji Finepix 1400 digital camera. Image post processed using iPhoto Plus4 and displayed at 96dpi.
This southerly view (20/5/07) shows the ballasted railway from the middle of Bryn-y-felin Cutting. It was expected that track would be laid here in early June, reaching the end of ballast next to the gate. A recent storm has caused a tree to fall across the line. Click on the image to enlarge. This image is copyright B.W.Hughes and was taken on a Kodak DX6490 digital camera. Image post processed using iPhoto Plus4 and displayed at 96dpi.

This westerly view (29/4/01) shows the railway emerging from cutting having rounded the curve behind Bryn-y-felin cottage built in 1910. The A498 Porthmadog-Beddgelert road runs alongside and for the moment cars may park on the alignment here. Click on the image to enlarge. This image is copyright B.W.Hughes. Slide scan technology utilised is Olympus ES10 & iPhoto Plus4. Slide scanned at 200dpi.
This northerly view (29/1/05) at Bryn-y-felin Cutting shows 'clearance for access' has taken place. Some trees have been marked red for removal as they are foul of the loading gauge. Click on the image to enlarge. This image is copyright R.J.Edwards and was captured on a Kodak DX6490 digital camera. Image post processed using Iphoto+4 and displayed at 96dpi.


These northerly views (29/1/05, 19/3/05, 27/10/06 and 11/2/07) of Bryn-y-felin Cutting show clearance has been completed in this area. In the background the trackbed curves to the right behind Bryn-y-felin house. The saplings have been mulched and spread on the cutting sides. The Leylandii hedge can be seen to the right. The fourth image shows the trackbed complete and awaiting ballast once the rockwork on Goat Cutting is finished. Click on the images to enlarge. The first image is copyright R.J.Edwards. The second and fourth images are B.W.Hughes and were captured on a Kodak DX6490 digital camera. The third image is copyright Chris Price and was taken on a digital camera. Images post processed using Iphoto+4 and displayed at 96dpi.
This northerly view (20/5/07 and 3/6/07) from the gate at the south end of Bryn-y-felin cutting shows the ballasted railway emerging from the cutting behind Bryn-y-felin house. A recent storm has caused a tree to fall across the line. Track was laid here in early June as shown in the second view but the Head of Steel in staggered rail just visible. Click on the images to enlarge. The first image is copyright B.W.Hughes and was taken on a Kodak DX6490 digital camera. The second image is courtesy/copyright John Ewing and was taken on a Fuji Finepix 1400 digital camera. Image post processed using iPhoto Plus4 and displayed at 96dpi.

These easterly view (29/4/01, 11/12/05 and 11/2/07) show the railway descending under the main road bridge OB173 at Bryn-y-felin. A gate and style under the bridge give access to the footpaths alongside the Afon Glaslyn beyond. The bridge is weak and has a bracing structure of steel girders. The bridge will be replaced as part of GCC's WHR bridges programme in early 2006, after the WHR has installed the new Bryn-y-felin bridge in January. The second view shows the WHR site office placed in preparation for these works. The third view shows the cutting widened and used as a ballast store. Click on the images to enlarge. These images are copyright B.W.Hughes. Slide scan technology utilised is Olympus ES10. The second image was captured on a Kodak DX6490 digital camera. Images post processed using Iphoto+4 and displayed at 96dpi.
This westerly view (27/10/06) shows clearance and levelling in the cutting on the approaches to Bryn-y-felin bridge. Click on the image to enlarge. This image is courtesy/copyright Chris Price and was taken on a digital camera. Image post processed using iPhoto Plus4 and displayed at 96dpi.
This northerly view (18/4/07) shows the completed trackbed north of Bryn-y-felin bridge. This is now being used for access to James Cyf.'s site just south of the road bridge. Click on the image to enlarge. This image is copyright B.W.Hughes and was taken on a Kodak DX6490 digital camera. Image post processed using iPhoto Plus4 and displayed at 96dpi.
Bryn-y-felin road bridge OB173
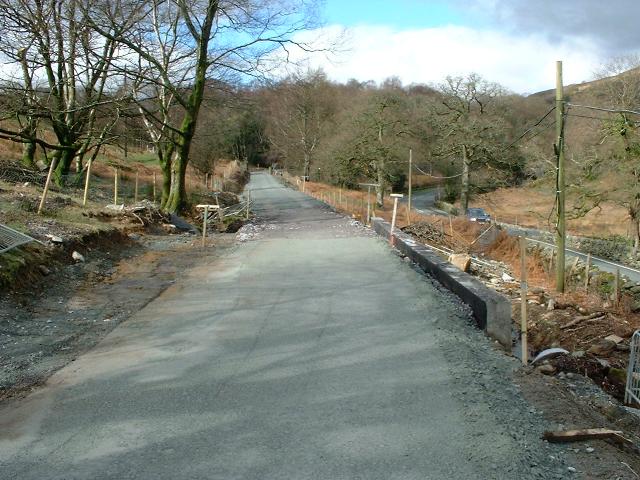
Work on the A498 Bryn-y-felin road bridge is programmed to start in Autumn 2007. Discussions are underway between Gwynedd Council (GC) and the WHRCL about the best way to progress this major rebuild without impeding progress with the railway. Track will have been laid under the bridge by that time and access must be maintained for tracklaying and ballast trains to continue towards Porthmadog. The bridge dates from the original 1922 WHR construction and has concrete abutments. It has a weak deck which is currently propped.

This northerly view (31/3/05) of OB173, the A498 main road bridge, shows the appearance before GC rebuild the bridge with a new concrete deck in 2007/8. Click on the image to enlarge. This image is copyright B.W.Hughes and was captured on a Kodak DX6490 digital camera. Image post processed using Iphoto+4 and displayed at 96dpi.
This northerly view (23/7/06) shows the rotting support props under Bryn-y-felin bridge. Wooden wedges support the road deck on the horizontal girders. All this is likely to be replaced by reinforced concrete beams and a cast in situ deck. There is plenty of height here for the Funkey. Click on the image to enlarge. This image is copyright B.W.Hughes and was taken on a Kodak DX6490 digital camera. Image post processed using iPhoto Plus4 and displayed at 96dpi.
Bryn-y-felin footbridge and footpaths
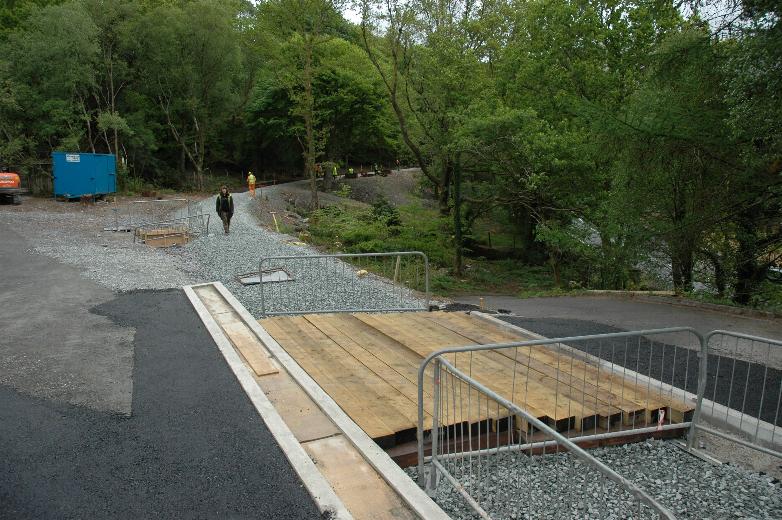
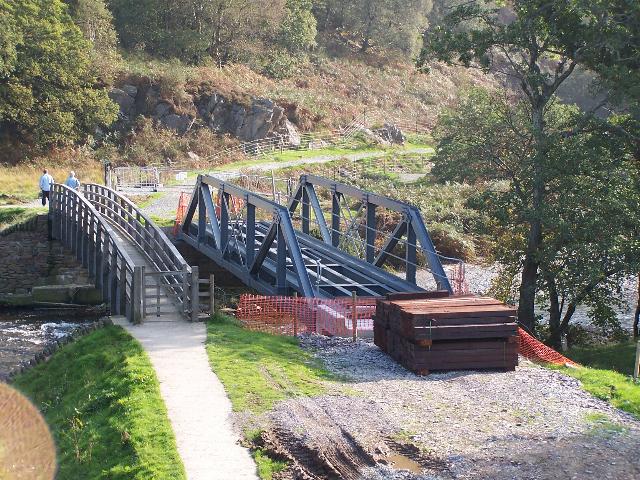
The Afon Glaslyn railway bridge at Bryn-y-felin was removed early in the ownership of the FR as it was in a dangerous state. It is to be replaced in 2006 at the same time as the A498 road bridge (OB173).

This westerly roadside view (29/4/01) shows the remains of the Bryn-y-felin bridge over the Afon Glaslyn. A new footbridge was built here opened Easter 2003 jointly funded by the SNPA, NT and FR. It is a few metres to the left (north) of the existing bridge abutments. Click on the image to enlarge. This image is copyright B.W.Hughes. Slide scan technology utilised is Olympus ES10 & iPhoto Plus4. Slide scanned at 200dpi.
A new footbridge is planned immediately to the north of the Bryn-y-felin bridge. It will permit a circular walk from Beddgelert via either bank of the Afon Glaslyn. The bridge is currently designed with its deck supported from an arched girder. It will permit wheelchair access. The bridge will offer interesting views of the trains coming across the new Bryn-y-felin bridge.
The delay in the construction of the footbridge was for financial reasons. In April 2002 Beddgelert Community Council was advised that costs had risen by 40% from the original £63,000 to £88,000. This was as a result of a request to Gwynedd Council to adopt the new bridge as a Public Right of Way. The status of the footbridge has been agreed but the design must now conform to more stringent Bridge Code specifications explaining the increase in project costs.
Commitments were sought from the various bodies contributing to the planned bridge, to meet the higher costs, and the SNPA agreed to increase its contribution to meet 20% of the £25,000 extra costs. The June 2002 meeting of the Beddgelert Council reported that funding was complete and that work would go ahead shortly. Some examples of paving for the disabled access path from Beddgelert to Bryn-y-felin were on display for comment by the Beddgelert footbridge during August 2002.
Beddgelert Community Council stated in their report of November 2002 that a grant application had been made to the Rural Recovery for Tourism Fund for the remaining shortfall. Following receipt of the grant, a start date of January 3rd 2003 was suggested for the footbridge construction works. The footbridge was finally completed at Easter 2003, though proper ramps and access for wheelchairs were provided later.

This northerly roadside view (30/12/02) shows the new metalled footpath from Beddgelert to Bryn-y-felin bridge. The meadow had been somewhat spoiled in the process. The footpath around the bridge will be completed as part of the bridgeworks in 2003. Access for JCBs was obtained via the railway formation under the former road bridge. Click on the image to enlarge. This image is copyright B.W.Hughes. Image captured using Samsung Digimax 230 digital camera. Image post processed using iPhoto Plus4 and displayed at 96dpi.
The National Trust, the landowner, was building improved paths, suitable for wheelchairs, leading to the footbridge site in November 2002 on either side of the Afon Glaslyn. These initial works were expected to be completed by 18/12/02. The works would include removing the kissing gate in the former east abutment of the PBSSR Glaslyn bridge. The eastern footpath used the old PBSSR formation.

This northerly roadside view (30/12/02) shows the new metalled footpath from Beddgelert to Bryn-y-felin bridge on the east bank of the Afon Glaslyn, which utilises the embankment of the former unused PBSSR formation. The west abutment of the former Bryn-y-felin bridge is also visible. Click on the image to enlarge. This image is copyright B.W.Hughes. Image captured using Samsung Digimax 230 digital camera. Image post processed using iPhoto Plus4 and displayed at 96dpi.
This easterly view (18/2/05) at Bryn-y-felin bridge shows NRG surveyors making initial measurements for the new bridge which will resemble the previous bridge. Click on the image to enlarge. This image is copyright B.W.Hughes and was captured on a Kodak DX6490 digital camera. Image post processed using Iphoto+4 and displayed at 96dpi.
The Nantmor Water Main runs along the trackbed between Beddgelert Cemetery and Bryn-y-felin. Work started in August 2006 to divert it, in advance of trackworks starting in the Autumn/Winter.
These northerly views (9/8/06 and 24/8/06) from Bryn-y-felin road bridge shows new fencing for the Welsh Water Nantmor water main diversion in the field alongside the A498 at Bryn-y-felin. It could be surmised that the line of this suggests a future road improvement between Bryn-y-felin and the Beddgelert Cemetery! The second view shows the water main being installed. Click on the images to enlarge. These images are copyright B.W.Hughes and were taken on a Kodak DX6490 digital camera. Images post processed using iPhoto Plus4 and displayed at 96dpi.
Bridge Reconstruction
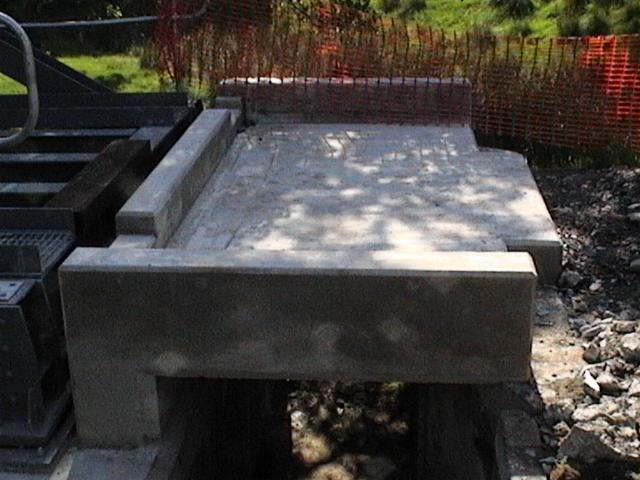
Unlike the otherwise identical pair of bridges further south, Bryn-y-felin bridge consists of three supports, having an additional pier close to the northern abutment. The rough rocks between the northern abutment and pier suggest this was never made up into an underpass or sheep creep and there was footpath crossing just yards to the north between the road and railway bridges. The purpose of this underpass remains obscure. It could be because at a late stage in building programme a source of 3 bridges of the same size was found that were 2m shorter than the abutments built at Bryn-y-felin.
The new bridge is to be placed in position in early 2006 before GCC roadworks begin on the adjacent road overbridge. The detailed design of the Bryn-y-felin bridge was partly determined by the design of the two identical bridges further south. Because of site location and access difficulties at the Afon Nanmor and Dylif bridges, the original all-welded common design was changed so that construction could, if necessary, be carried out in-situ over the rivers by having temporary supports and bolting together the individual elements Meccano style. Bolted nodes give maximum flexibility on site. On-site welding is not favoured generally due to the very onerous quality control needed. Caernarfon based fabricator D J Williams supported by structural engineer Mike Barnard put in a strong bid based entirely on all bolted joints and this was accepted by the WHRCL. All three bridges will be identical to give economy of scale.
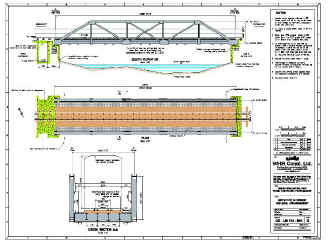
This image shows the plan of the replacement Bryn-y-Felin bridge (UB174). Click on the image to view the pdf file. Click here to download the Adobe Acrobat PDF reader. This file is courtesy John Sreeves. Image post processed using iPhoto Plus4 and displayed at 96dpi. Plan courtesy WHRCL.
The end result is that having bolts rather than welds gives an appearance more similar to the original Douglas Fox design. Furthermore, the WHRCL has requested that the fabricator assembles the bridge using tension control bolts (TCBs), which have the appearance of rivets, as well as being about 30% stronger than ordinary HSFG bolts. The end result is that there will be one splice in the bottom chord at 40% of the distance from one end, i.e. breaking it down into nominally 2 and 3 bays length, plus the bits at the end. By coincidence this also replicates Douglas Fox’s design. Each bay is exactly 4.572m long (or 15’ for the purists!). The top chord is 13.716m long and will be in one piece. Connections are made through 25mm thick gusset plates.
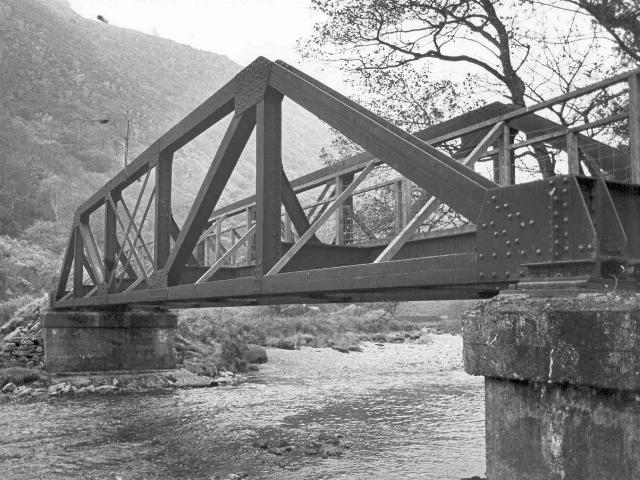

These easterly views (7/11/87 and 1/06) show the abutments and girders of the Bryn-y-felin bridge. The second view shows the end of a truss, which is part welded and part bolted. Comparison of the two shows how similar the bridges will appear. The bolt heads on the new girders are rounded with the appearance of rivets like the original bridge. The bolts are tightened from the reverse side only, by a special wrench that grips the bolt shank as the nut is turned. Later, there will be a handrail support post attached to the top. The white dye applied to the welds is part of a testing process which reveals any hairline cracks in the welds. Click on the images to enlarge. The first image is courtesy/copyright David Allan. Image taken on a Concord 3340z 3.1Megapixel digital camera. The second image is courtesy/copyright John Sreeves taken on a digital camera. Images post processed using iPhoto Plus4 and displayed at 96dpi.
Between the side frames there is a grillage of cross members and rail bearers supporting the roadway and these all have bolted connections. The rail bearers are connected to the cross beams through angle cleats as in the original bridge. The cross beams are connected to the side frames through end plates and much thought was given to the stiffening in this critical zone as there will not be any internal diagonals across the corner. Finally, lightweight diagonal angles are slung underneath to keep everything nicely square and rigid against wind and locomotive nosing loads.
Fabrication of the Bryn-y-felin bridge started in early November. It is hoped to deliver the trusses in a disassembled state in March 2006, just taking a few minutes for the road closure to off load them onto the site beside the bridge. They will then be assembled before the crane lifts the structure into place over the next two days.
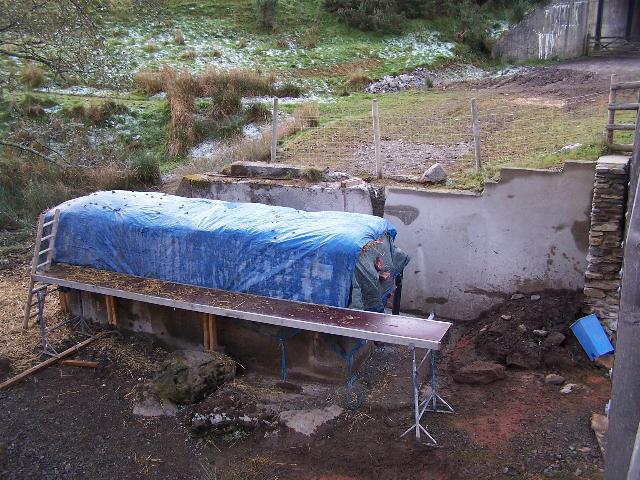
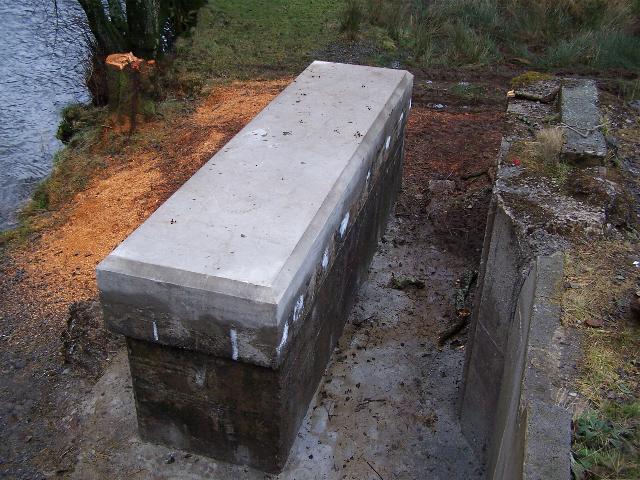
These views (20/11/05) of the west abutment at Bryn-y-felin shows the isolated pier on the west bank receiving attention. The straw covering was added to protect the concrete from frost during the curing process. The new cap is shown in the later view together with the voids filled around the base to secure the foundation. Click on the image to enlarge. This image is copyright B.W.Hughes and was taken on a Kodak DX6490 digital camera. Image post processed using iPhoto Plus4 and displayed at 96dpi.
Both abutments received attention during the building of the new footbridge. A joining section of breeze block wall with a rendered surface filled the gap between the two abutments. However, the east abutments of the footbridge suffered some scour. This was being attended to from November 2005, when river levels were low enough, though no progress was visible in mid-February. The same contract saw the ground around the west pier levelled with voids filled under the shallow foundations and the top of the pier was increased in height by the addition of concrete to provide a gradient to drain the new bridge. Other work is to be done to prepare the abutments.

This easterly view (20/11/05) at Bryn-y-felin shows the footbridge abutment and stockpiled sandbags. The scouring only seems to affect the wing-wall. Click on the image to enlarge. This image is copyright B.W.Hughes and was taken on a Kodak DX6490 digital camera. Image post processed using iPhoto Plus4 and displayed at 96dpi.
Bryn-y-felin bridge placement
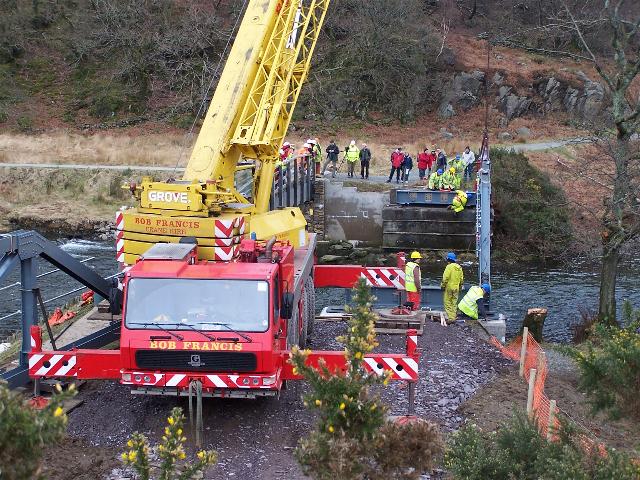
All went well for the major operation of replacing the Bryn-y-felin bridge on 11/3/06. The operation was fairly low profile and was not marred by protestors. The 3 day programme included a Temporary Footpath Closure Order as the adjacent footbridge was under the path the 7 tonne trusses would take as they were craned into place. Bob Francis' crane accessed the site via the trackbed under the road bridge. The bridge was completed with its temporary road deck over the next few days.
The transom beams (cross-members) and waybeams had been delivered on 10/3/06, following trial assembly at Williams' base at Caernarfon. The two side frames were bolted together with temporary spacers and loaded onto an extending articulated lorry in Caernarfon and delivered via Tremadog. The same method of delivery will be used for the two subsequent bridge orders for the Afon Nanmor and Dylif, though getting the crane and frames to these remote sites will be much more difficult.

This easterly view (11/3/06) shows Bob Francis' crane being stabilised ready for the unloading operation. It was later to move nearer the abutments for the placement of the frames in their final resting place. The transom and waybeams delivered the previous day can be seen to the left. Click on the image to enlarge. This image is copyright B.W.Hughes and was taken on a Kodak DX6490 digital camera. Image post processed using iPhoto Plus4 and displayed at 96dpi.
This southerly view (11/3/06) shows the two frames being lifted off the lorry and swung over the formation to the left before the lorry departed to reverse in Beddgelert. Click on the image to enlarge. This image is copyright B.W.Hughes and was taken on a Kodak DX6490 digital camera. Image post processed using iPhoto Plus4 and displayed at 96dpi.
This easterly view (11/3/06) shows the two 7.5 tonne frames being craned down onto the trackbed. Click on the image to enlarge. This image is copyright B.W.Hughes and was taken on a Kodak DX6490 digital camera. Image post processed using iPhoto Plus4 and displayed at 96dpi.
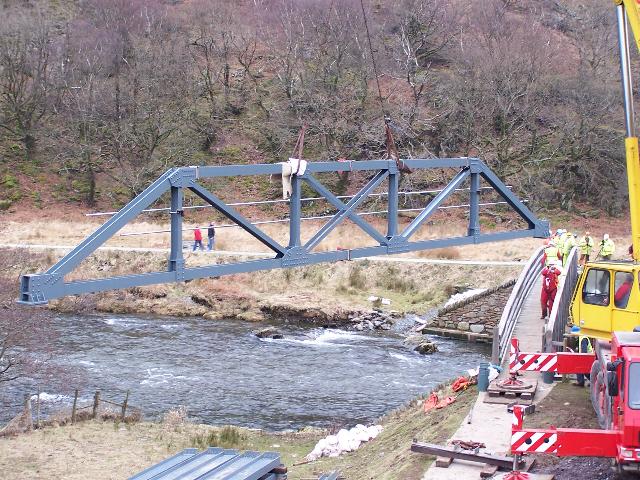
This westerly view (11/3/06) shows the first girder being craned into place across the Afon Glaslyn. Click on the image to enlarge. This image is copyright Mike Jenkins and was taken on a digital camera. Image post processed using iPhoto Plus4 and displayed at 96dpi.
This westerly view (11/3/06) shows the second girder being craned into place across the Afon Glaslyn. Click on the image to enlarge. This image is copyright Mike Jenkins and was taken on a digital camera. Image post processed using iPhoto Plus4 and displayed at 96dpi.
This easterly view (11/3/06) shows Bob Francis' crane now moved nearer the abutments for the placement of the frames in their final resting place. The southern frame has just been positioned and can be seen being bolted to the transom beams on the abutments before being released by the crane. Click on the image to enlarge. This image is copyright B.W.Hughes and was taken on a Kodak DX6490 digital camera. Image post processed using iPhoto Plus4 and displayed at 96dpi.
This easterly view (11/3/06) shows the northern frame being rotated over the river so the handrails are on the railway side. Click on the image to enlarge. This image is copyright B.W.Hughes and was taken on a Kodak DX6490 digital camera. Image post processed using iPhoto Plus4 and displayed at 96dpi.
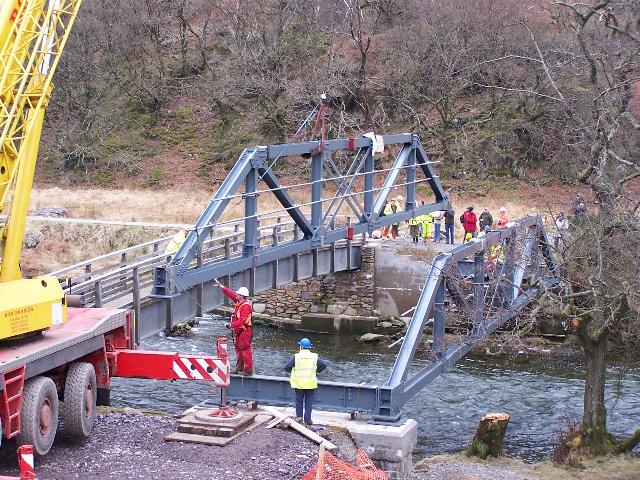
This easterly view (11/3/06) shows the second frame being placed on the abutments at Bryn-y-felin bridge. Work was due to proceed on the Sunday and Monday completing the task, including the establishment of a temporary roadway deck for dumper trucks carrying ballast to re-establish the trackbed south from here. Click on the image to enlarge. This image is copyright B.W.Hughes and was taken on a Kodak DX6490 digital camera. Image post processed using iPhoto Plus4 and displayed at 96dpi.
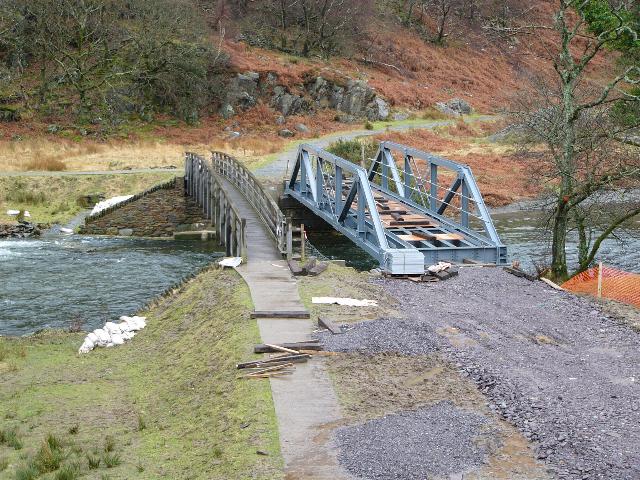
This easterly view (14/3/06) shows the completed bridge with all the transoms and waybeams bolted in place. Deck plates were to be added later to allow the passage of large dumper trucks carrying ballast for the completion of the trackbed, possibly later this year. Click on the image to enlarge. This image is courtesy/copyright Clive Parrot and was taken with a Panasonic Lumic DMC FZ10. Image post processed using iPhoto Plus4 and displayed at 96dpi.
The bridge has received decking for construction vehicle use, hand rails and attention to bearing pads since erection.

This easterly view (11/8/06) shows grouting of the bearing pads has taken place a few days before. Click on the image to enlarge. This image is copyright B.W.Hughes and was taken on a Kodak DX6490 digital camera. Image post processed using iPhoto Plus4 and displayed at 96dpi.


These easterly views (24/8/06 and 16/9/06) show the construction of the formwork for the concrete pour that will complete the link span to the bridge. The second view shows the deck complete with ballast retaining upstands. Click on the image to enlarge. This image is copyright B.W.Hughes and was taken on a Kodak DX6490 digital camera. Image post processed using iPhoto Plus4 and displayed at 96dpi.
This southerly view (16/9/06) shows the newly cast concrete linkspan at the western end of Bryn-y-felin bridge. Click on the image to enlarge. This image is copyright B.W.Hughes and was taken as a snapshot on a JVC digital camcorder. Image post processed using iPhoto Plus4 and displayed at 96dpi.
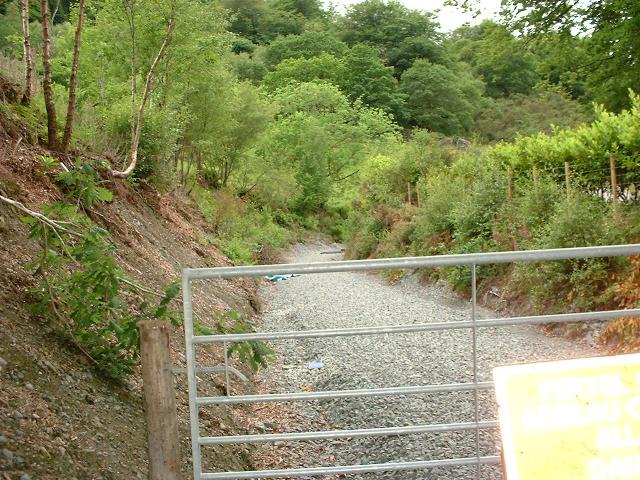
Wiring of the fence posts has now rapidly advanced down the Aberglaslyn Pass and is complete on the eastern side between Bryn-y-felin and the long tunnel. Wiring is now working north from the tunnels. Steel gates have also been erected just east of Bryn-y-felin bridge, where the Fisherman's Path crosses the route at LC90. Wooden fencing was also erected south of Nantmor to the road bridge (UB182) earlier in the Summer.
This easterly view (16/9/06) shows the completion of fence posts just east of the Bryn-y-felin bridge and the construction of steel gates for the footpath crossing. Click on the image to enlarge. This image is copyright B.W.Hughes and was taken as a snapshot on a JVC digital camcorder. Image post processed using iPhoto Plus4 and displayed at 96dpi.
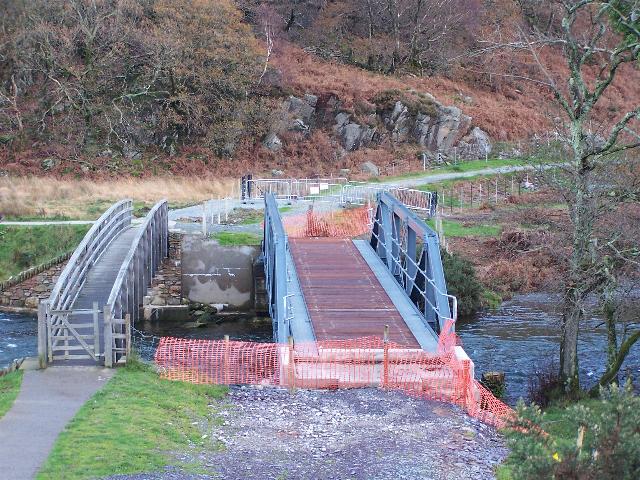
This southerly view (15/10/06 and 26/11/06) shows the fitting of a wooden deck to Bryn-y-felin bridge. Beyond can be seen the completed fencing and barriers to keep walkers off the trackbed at LC90. Click on the images to enlarge. These images are copyright B.W.Hughes and were taken on a Kodak DX6490 digital camera. Images post processed using iPhoto Plus4 and displayed at 96dpi.
This easterly view (21/1/07) shows the drain constructed under the trackbed at Bryn-y-felin. Click on the image to enlarge. This image is courtesy/copyright Ben Fisher and was taken on a digital camera. Image post processed using iPhoto Plus4 and displayed at 96dpi.
This easterly view (21/1/07) shows the drain outfall constructed with local stone. Click on the image to enlarge. This image is courtesy/copyright Ben Fisher and was taken on a digital camera. Image post processed using iPhoto Plus4 and displayed at 96dpi.
This westerly view (21/1/07) shows the drain constructed under the trackbed at Bryn-y-felin. Click on the image to enlarge. This image is courtesy/copyright Ben Fisher and was taken on a digital camera. Image post processed using iPhoto Plus4 and displayed at 96dpi.
This easterly view (20/5/07 and 27/6/07) shows James Cyf's compound, with the Bryn-y-felin bridge in the background. The public footpath can be seen to be diverted to the left of the compound and under the bridge before rising to join the main road to the right. A large piles of slate fines has been delivered for levelling and rolling the formation before ballasting. Click on the image to enlarge. This image is copyright B.W.Hughes and was taken on a Kodak DX6490 digital camera. Image post processed using iPhoto Plus4 and displayed at 96dpi.
Click here to visit Aberglaslyn Pass page
Click here to return to the Stop Press Page
Site Development
If you have suggestions for development of this site, please contact me by email at the address on the Stop Press page.
Comments
Please add comments in my Guestbook on the Stop Press page.
Page Version 4.46 Dated 1/7/07